For years now, I've been wanting to do a sugarcane diesel like I saw all the time when I was little, living near the now-closed Moreton Sugar Mill in Nambour, Queensland.
I didn't really fancy building one from scratch, but I noticed the Accucraft Baguley is a dead-ringer for a cane loco.
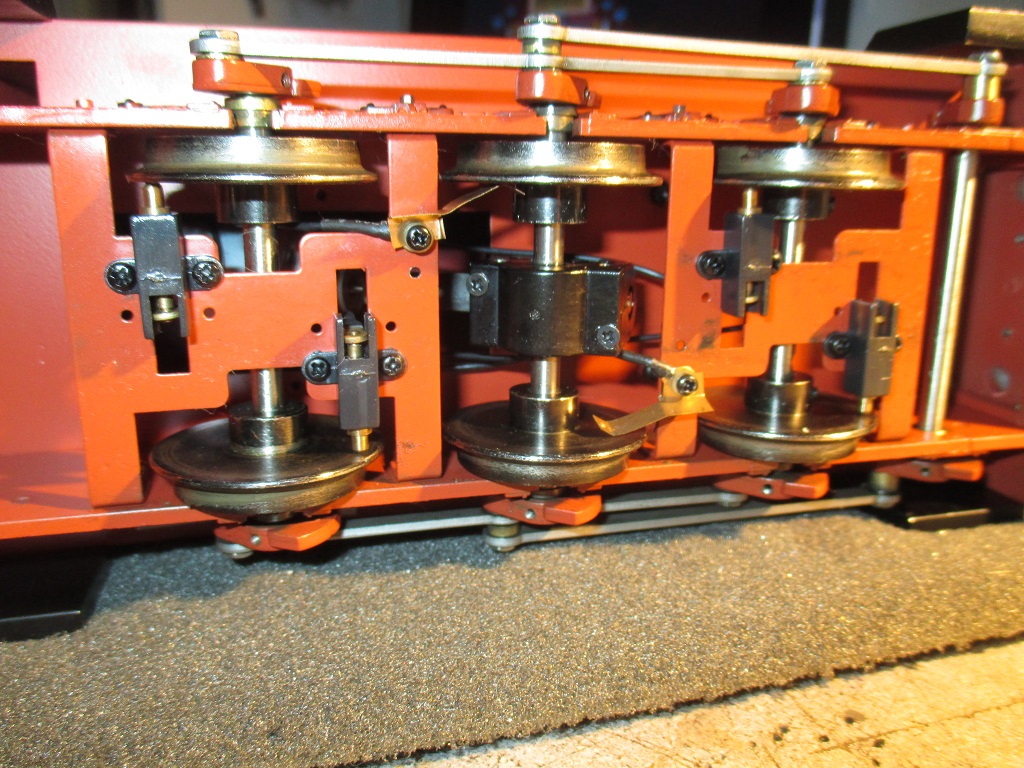
12/02/18
Now, most Australian cane locos have a strobe light on the cab roof, so of course I wanted my loco to have that. However, I'm a moron, electronically and otherwise.
I found this "learning kit" thing from Jaycar for $20.
For any Poms or Yanks reading this, Jaycar is Australia's Maplins or Radioshack, respectively.
The kit was simple enough to assemble. The potentiometer (metal knob) on the battery end of the chip, controls the rate of flashing.
The resistors are poking up high like that because I was experimenting with orange LEDs and needed to change out the restistors to suit. The orange ones were too dim regardless of resistors.
I ended up just using the standard white one, painted with Tamiya clear yellow with a little red mixed in.

13/02/18
In late 2017, I asked in a few Farcebook groups if anyone was looking at selling a Baguley, and that I'd be interested in buying in early 2018.
A fellow in the UK sold me this one for £260+post. Worked out at $630AUD after shipping and Paypal's $40 "currency conversion" extortion.
Thankfully he decided to put it in an extra box. Dickhead package handlers abound..

It's like Christmas, only I don't hate everything about it, nor is anyone trying in vain to guilt me into (in my book) meaningless cultural/social nonsense.

A few years old but in very good order, and it's the later metal chassis version, to boot. 

These locos are track-powered, though many convert them to battery R/C.
This one's had extra pickups added to the centre wheelset. I'll be converting to manual battery power so these'll be removed and stored for safekeeping.
This one's had extra pickups added to the centre wheelset. I'll be converting to manual battery power so these'll be removed and stored for safekeeping.
Dwarfs every piece of steam-era equipment I have - just like the real thing.

Will have to get this thing out for another Navvies train and fix the track again.

Not an hour later, I'd removed the body for a look at the guts. Seen it online but still..
Loads of room to play with; And the all-steel chassis weighs a bloody ton.
Loads of room to play with; And the all-steel chassis weighs a bloody ton.

14/02/18
After carefully masking off the motor and all moving parts, the chassis was taken to the drill press. Holes for the headlight switch, charge socket and reversing switch were drilled.
After carefully masking off the motor and all moving parts, the chassis was taken to the drill press. Holes for the headlight switch, charge socket and reversing switch were drilled.

Headlight
switch and charge socket installed. I also drilled and tapped to M3, a
hole in the centre of the end frame spacer, behind the headstock on the
right..

..And cut a piece of scrap tinplate to make a holder for the strobe light's 9V battery.
The reversing switch was glued behind the front step.
The reversing switch was glued behind the front step.

The air filter was carefully cut off and drilled out to fit over the speed control knob.

A battery pack was made up of ten 2.4AH tagged NI-MH cells, to make a 12V battery pack.
I fitted a 1.6A self-resetting fuse and a little connector plug so the pack can be easily removed from the loco. A "highly professional" coating of electrical tape holds it all together.
Markings denoting polarity tops it off because I can't remember jack shit, and these batteries cost fifty bucks - I'd rather avoid shorting them and frying things.

16/02/18
Seems to work. Sorry about the potato-grade quality, I forgot my camera was on such a low setting.
A smart charger arrived today. Once I learn to use it, it should take most of the guesswork out of charging this and other locos..
Seems to work. Sorry about the potato-grade quality, I forgot my camera was on such a low setting.
A smart charger arrived today. Once I learn to use it, it should take most of the guesswork out of charging this and other locos..
17/02/18
Took the newly-converted loco down to Zillmere for a test run. Unfortunately, despite having topped up the batteries the previous day, it ran for less than 30 minutes.
Others at Zillmere let me know that NI-MH batteries need to be "cycled" - charged and discharged several times to break them in, before I'll get any decent life out of them..
Note the hole drilled in the front of the cab for the front headlight. I can't do the headlight side of wiring until the body has been repainted but I can at least drill the mounting holes.

20/02/17
Long story short, after 3 days of dicking about trying to cycle the batteries with this complex charger, I think I've managed to break the batteries in, or I'm at least getting close. Well either that, or it'll spontaneously-combust at any time, or some other nightmare..
On a similar note:
I converted my LGB Stainz to onboard battery power a couple months back using nearly all the same components as this loco - besides Li-Ion batteries instead of the NIMHs in this one. After converting it, the thing ran just fine. When the time came a fortnight later, to give it a proper test run at Zillmere, it wouldn't go. Checked the battery, fully charged. Headlight circuit worked fine, so it maybe it's something on the motor side of things, who knows
When it comes to electrickery, I've clearly very, very little clue what I'm doing..

So I took the body off and removed the windows.
The body was then washed in detergent, dried with a heat gun on low, then primed.
The body was then washed in detergent, dried with a heat gun on low, then primed.

While waiting for the batteries to cycle, some
simple seats were made, based on a photo of the seats fitted to ex-Victoria Mill's
Baguley loco "Seymore", now at the Illawarra Light Railway in NSW.

A
control desk was freelanced, based on Clyde, EM Baldwin and Baguley
prototypes. As it's diesel, I've no idea if it's prototypical but it'll
do me.

Centre-console-switchboard

A new false floor was made from scrap, to match the height of the cab doors on the outside.
The only interior detail the loco comes with, is a plastic handbrake column. This was screwed into the steel chassis, but snapped when I tried to unscrew it. I drilled out the base, tapped it M2 and fitted an M2 screw through the new floor to hold it.
The only interior detail the loco comes with, is a plastic handbrake column. This was screwed into the steel chassis, but snapped when I tried to unscrew it. I drilled out the base, tapped it M2 and fitted an M2 screw through the new floor to hold it.

23/02/18
On the prototype running on the Vale of Rheidol Railway in Wales, those ungainly block things on the headstocks are part of the air brake system. There's air hoses hanging from those blocks, but not on the model as standard.
Well, cane railways don't have continuous brakes, and their loco's headstocks are generally pretty flat.
So out with the hacksaw and angle grinder. (files and dremel weren't up to these weirdly hard steel castings)
I knew I couldn't avoid damaging the headstocks and rope-shunting brackets, so some filler primer shows where I'll be needing some bog. The gouges are deeper than they look but it's no problem..

24/02/18
I dug out the plate from the Baguley loco at Woodford. Some measurements and this straight-on photo are all I need to get a miniature of this plate made up for my own loco.
Yeah, the prototype of my model was built in the 1990s and our loco at Woodford is 1950s vintage, and my model is intended to be of 60's vintage, but they're pretty similar locos. I think I can get away with it, anyway..
I later realised the RMP Baguleys all had rounded bonnets, whilst mine is square at the front. My loco wouldn't pass for an RMP, without serious bonnet surgery anyway. A standard "Baguley - Drewry" plate would be more appropriate here..

25/02/18
The roof was painted silver, then misted over a few times with grey primer to dull it down.
The roof was painted silver, then misted over a few times with grey primer to dull it down.

El-Cheapo yellow paint was used as a basecoat for the final colour.

27/02/18
Looking like I'm turning into a Simpsons character, the first coat of Tamiya Chrome Yellow (same as I used on the Malcolm Moore) has been applied.
Looking like I'm turning into a Simpsons character, the first coat of Tamiya Chrome Yellow (same as I used on the Malcolm Moore) has been applied.

That night, I applied the second coat.
I really need to stop spraying at night. Being dark, I can't see shit,so occasionally I'll unknowingly apply too much paint in areas.
Here, I managed to just about fill in the deep panel lines and get runs nearby. All I could do was scrape out the panel lines with a fingernail, then try to smooth off the surrounding damage with the same finger. This thick bit could take up to a week to harden, after which I can start sanding back all the damage and look at reapplying coats.
God fucking dammit.

No comments:
Post a Comment