After 106 years of operation, the Moreton Sugar Mill in Nambour, Queensland, closed on 03/12/2003.
The mill was demolished, the tramway feeding cane to the mill was pulled up, and the locomotives and rollingstock ended up at other sugar mills, private collectors, and several heritage railways.
A few years ago, it occurred to me to run some of my G gauge sugar cane railway models, along a section of the local Moreton tramway roadbed. Just because I could, really..I figured the well-known tramway cutting at Bli-Bli, (shown in operation here) would be a good spot to do it, now being public land, easily accessible, and a relatively flat track bed.
I then figured if I'm going to the trouble, I might as well invite others to enjoy it, and do it in December to coincide with 15 years since the mill's closure.
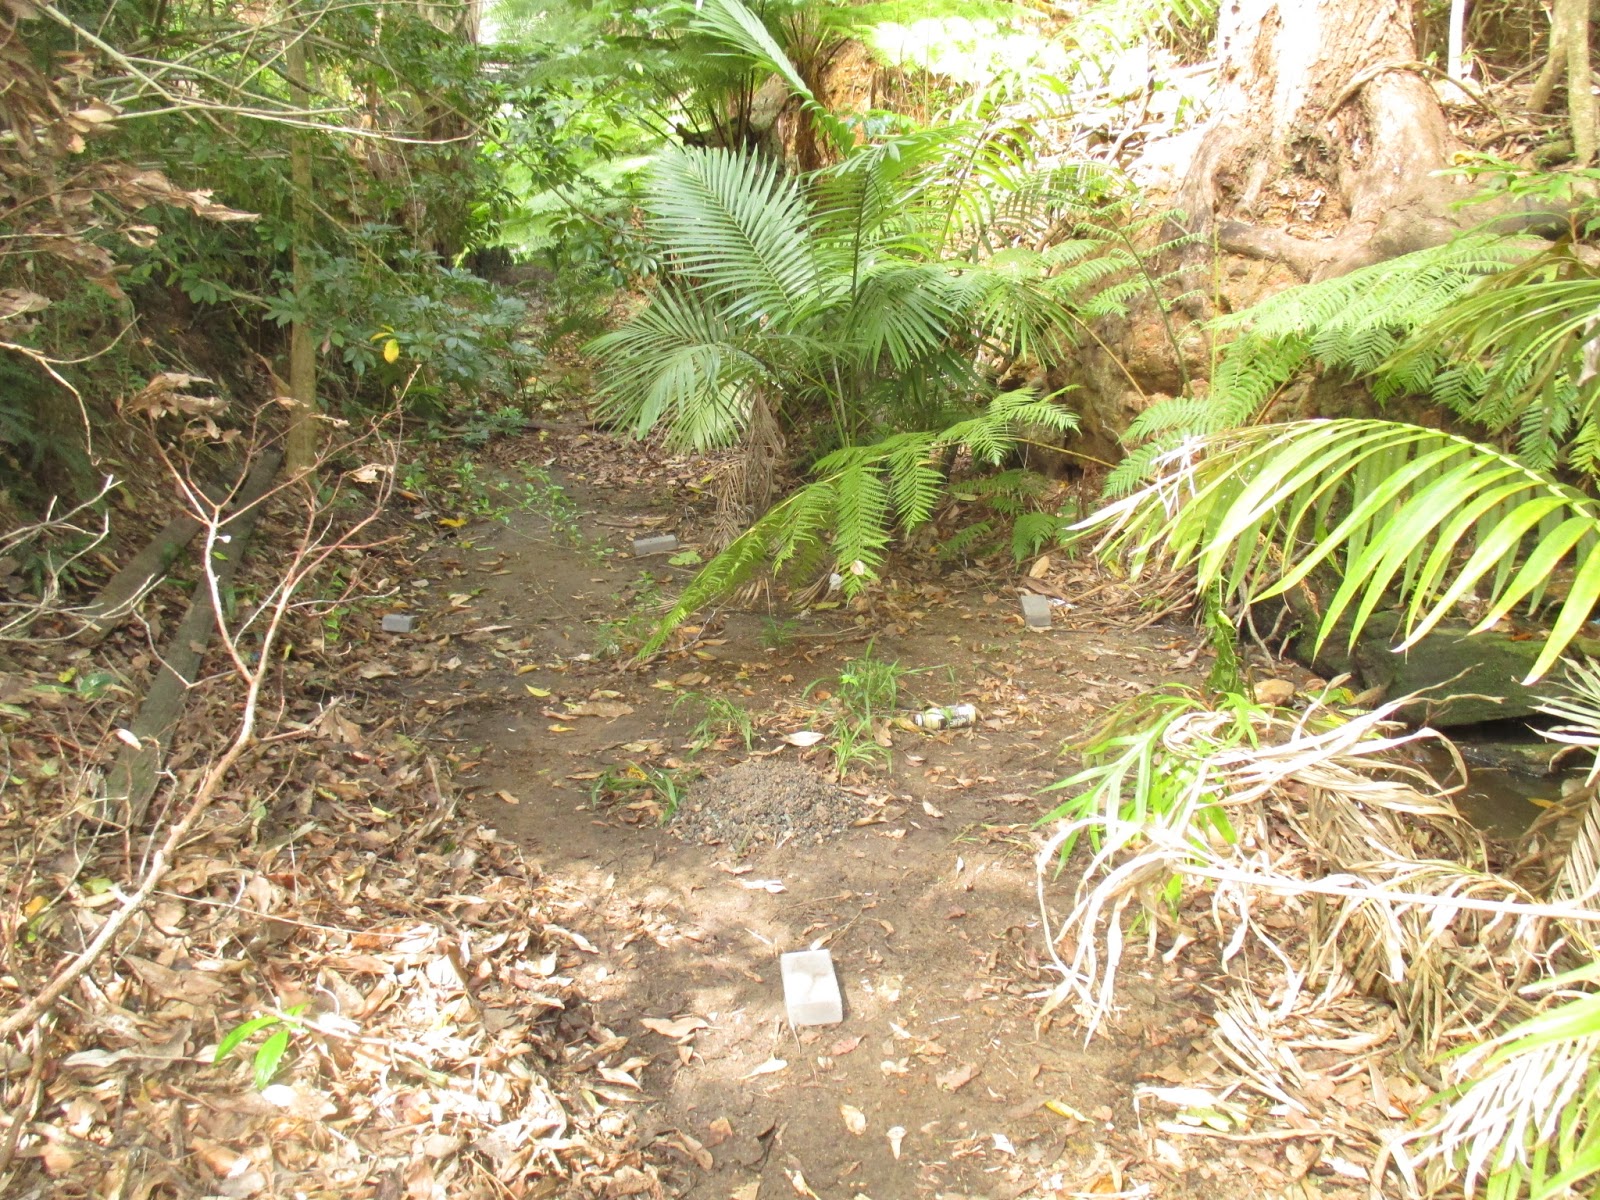
By early 2018, the cutting had become a rainforest. I went to the cutting to get an idea of how far along the old track bed I wanted to run. Eventually, I settled on 60 meters.

09/05/18
At about this time, I sent out invitations to several groups who may be interested, and let them know there'll be plenty of siding space should they want to bring something to run..
I'd previously built a garden railway at home, but as the unit has sold, we need to move out by September.
Due to the extremely high cost of proprietary G-gauge track here in Australia, (from most vendors, that is) I decided to hand-lay my own track. Using code 250 aluminium rail, spiked with modified nails, to whatever hardwood scraps I could find and cut into sleepers.
When I ripped up the track, I found the unknown random hardwoods have fared quite poorly over the last 3 years, since the track was built. The sleepers will be binned, and the rail reconditioned for reuse. There's about 20m of track here, it was a very small railway. I'll have to order another 40m worth of rail, when I can find some at a reasonable price..
When I ripped up the track, I found the unknown random hardwoods have fared quite poorly over the last 3 years, since the track was built. The sleepers will be binned, and the rail reconditioned for reuse. There's about 20m of track here, it was a very small railway. I'll have to order another 40m worth of rail, when I can find some at a reasonable price..

29/07/18
I finally have all the track pulled up, and have set up a temporary bath in which to scrub off all the dirt and moss, prior to removing the sleepers with vice grips. About 5m worth of rail wasn't worth spending the time trying to save, and was binned. Any salvageable rail joiners were removed (often needing heating with a torch first!) and safely stored for later cleaning and reuse.

26/08/18
Progress has been slow, thanks to preparing for the house move. All the sleepers have been removed from the rails.
After a lot of research, Western Red Cedar was chosen for the new sleepers, and had to be specially ordered at Bunnings. This stuff is popular on Yankee garden railways (not just for sleepers), and depending on rainwater drainage, I should get 10-15 years out of it. I've worked out I'll need just shy of 2,000 sleepers for 60m of track - plus a couple of extra planks for point timbers.
So after finding out what sizes of boards were available, I worked which size would be the most economical to use. (read: least amount of waste material) The boards I picked ended up leaving zero waste besides sawdust.
Took some time to save up for, too. $410 worth, plus another $90 for a cheap table saw to rip the boards down.

28/08/18
This is the downside to painting aluminium rails - when you want to strip and repaint it. After trying and failing with a wire-wheel, I realised chemical cleaning was my only option.
After some research to make sure caustic soda wouldn't eat through the cheap tarpaulin, another bath was set up, this time on the driveway in front of the garage. Took a while to fill up with water from the kettle and stove, but using hot water sure does make a difference.
What I didn't think to check beforehand, was weather aluminium was affected or not, by caustic soda. Turns out the soda is highly corrosive to aluminium, and here, the fizzing in the water is flammable hydrogen gas being produced by the reaction. A fan was set up to blow it away, and I proceeded with renewed caution.
I should say the reason I never bothered with paint stripper, is because nearly all available today are useless, thanks to the toxic but effective chemicals being replaced with useless biodegradable shit.
I can understand and agree why this was done, but like most situations I can see both sides of, it's just a shitty, sadistic situation all round.

Even with the soda cutting into the metal under the paint, a lot of scrubbing with wire brushes was required. Most of the rails needed 2-3 30-minute soaks in the bath, before the paint was effected enough to scrub off entirely.
And this was cheap paint, with no primer, applied with a brush, after the track was laid in the garden, followed by 3 years of UV exposure. Go figure.
The whole job was done without incident over two days, with the soda being heavily diluted and washed down the storm drain.

29/08/18
If I ever wanted to build models for competitions, this would be a handy trick for a perfectly scaled corroded steel effect..
The rail looks bad here, but it's quite useable, and won't be noticed when it's in use.

When I removed the old sleepers from the rail, the spikes (20mm flat-head nails) were rusted solid into the wood. I had neither the time nor energy to cut/grind away all the heads with a dremel, so the sleepers and nails were ripped away from the rail with vice grips.
This has left burrs in the foot of all the rail, and will need to be dealt with.

Careful use of the bench grinder eventually had it sorted. There's still visible dimples in the rail foot, but again, will be hardly noticeable when all is said and done.

30/18/18
Many twisted and kinked areas were (I felt) best annealed prior to attempting to straighten them. Annealing aluminium is tricky due to it's annealing temperature being very close to it's relatively low melting point.
The trick is to colour all material to be annealed with permanent marker, then gently play a small butane torch on the metal.
The aluminium is fully annealed when the permanent marker disappears all but entirely. Needless to say, annealed aluminium is incredibly soft and prone to damage, so must be handled carefully.

The salvaged joiners were cleaned in citric acid overnight. There's also some M2 threaded rod in there, from a set of stub points on the old railway. I won't be building any more stubs, but it'd be a waste to throw the rod away.

As a "proper" rail bender just isn't necessary, to build track with code 250 aluminium rail, I've always bent it by by hand.
However, I knew I would need a bender to evenly remove the kinks and twists from these rails.
So, copying some existing homemade benders, I temporarily converted my cheap machine vice into what I call a "Ghetto Rail-Bender" . For stability and ease-of-use, the bench grinder was removed from it's stand, and the bender bolted on.

31/08/18
Rails are all straightened.

My first garden railway was very much an exercise in "What not to do". One such example, was an experiment in using lego pieces, about 3" long, as sleepers, every 8" or so, and glued to the underside of the rail with contact cement. These "sleepers" were then ballasted over, tramway style. Needless to say, it wasn't particularly successful.
Some rail still had glue under it even now, which needed to be removed. Careful use of the small torch weakened the glue..

..Which could then be easily removed with a wire wheel in the drill press.

Many rail ends weren't cut very straight at all. Some like this, were cut on an angle for pointwork components. The worst of them were cut off with a hacksaw.

Most could just be cleaned up with a file, though.
Thus concludes the tedious process of reconditioning 15m worth of rail. The worst however, is yet to come..

01/09/18
Dogspikes were next on the agenda. While I could now afford to buy premade spikes, I still wasn't keen on spending another few hundred bucks just for that. I still haven't even found some rail, and I don't know how much that will cost.
So like last time, I'm using 20mm nails - at a tenth of the cost of "proper" spikes.
To improve their appearance, half of the flat heads are ground away on the bench grinder.
Every sleeper needs 4 spikes, occasionally more. 2,000 sleepers, therefore means 8,000 spikes, plus an extra thousand or so, for pointwork and spares. I am not looking forward to this..

A nail is plucked from the box, held with pliers, half the head ground off, and tossed into an empty pet water dish. I needed a metal dish because the nails, when they're ground, get too hot for plastic.
A new pair of pliers were bought, ones with soft handles, to make this job less shitty to do. They really made a difference.
From picking out of the box, to dropping it in the dish, each nail takes about 7 seconds to do, on average. Listening to music on noise-cancelling headphones also helps pass the time. Even so, I can only manage about 30-50 minutes at a time. So I'll swap back and forth between making spikes and making sleepers, over a few hours. Both grinder and drill press motors get pretty damn hot during a session, so I'm careful not to push them too hard or too long.
Depite spreading the grind across most of the wheel's surface, it eventually becomes tapered after a session or two, due to the sheer abount of grinding to do. Stops to remove the cover, flip the wheel over and replace the cover, are numerous.
Whatever I do, I have to keep making progress. I have a deadline to meet, a house move to deal with, and the process of handlaying track is a very, very slow one - especially when you make things yourself to save money.

Finally getting round to the sleepers. Cedar smells real good.

The cheap "Ozito" brand table saw was duly assembled, and after some fucking about setting the fence, I got stuck into ripping down the cedar boards.

About one board's worth of sleeper blanks.

I double-checked the rulers on the table (they're stickers!) for accuracy. One was 1mm out, and was re-positioned and re-glued. I'm not at all happy with these knobs. They're too small so they're very painful on my hands to tighten enough to stop the fence from moving.

02/19/18
A few hours of fiddling later, the knobs were replaced with M6 nuts and bolts. This is far better, I can get back to work.

Every now and then, the sawdust was swept into buckets. This stuff smells great when it's smouldering, and I have an idea to use the sawdust for another project, in time..

11/09/18
Having finished ripping down the boards, I've gotten back to some of the numerous other projects needing completion in time for Bli-Bli. While "Victoria" is on a running in turn on a loop of Newqida plastic track, I'm cutting out some styrene parts for the cane bins.

14/09/18
With all the boards ripped down, they needed to be chopped into 90mm lengths. Clamping a scrap of pine to the saw, as a stop, made for quick completion of this job - well, for 8,000 sleepers, anyway..
When the pile on the table became big enough to fill a bucket, the sleepers were pushed into said bucket, to be dumped on an adjacent table out of the way.

Four hours later, the sleeper blanks were cut, the remaining sawdust collected, and I'd run out of daylight.

I did keep about 20 sticks, to be hand-cut to various lengths for building points.

I'll be needing ballast here and there on this project, so I'd been gathering gravel from a overgrown, disused parking area in the bush, in my neighborhood.
As I did building my first garden railway, the gravel had to be collected one bucket at a time and brought home on my bicycle.
Needless to say, this was a pain in the arse - and knees, and ankles, and back.. So I'd gradually build the stockpile over the months leading up to December.

We've also finally found a new place to move into, so we're moving next week. Though I'll keep making dogspikes for a few days yet, the sleepers were packed carefully, so as to save space and boxes. One large and one small box just held them all.

19/09/18
I'd had a hard time finding rail joiners that don't cost a fortune. Most were about $1 each, which doesn't sound bad, until you realise you need about 100, you've spent all your meager savings on sleepers, and have yet to save up another few hundred for rail.
I also had to buy a few parts for "Victoria" from Roundhouse, and found the Peco joiners they sell, worked out around 40c each.

03/10/18
House move was eleven days ago, and things are finally set up enough that I can get back to work.
Some track gauges will be needed before I can start building track. So I took a section of Newqida plastic track, then took a hacksaw and dremel sanding disks to some aluminium bar I had on hand.
Something thicker like 1/2" bar would be better, but I don't have the time, money or energy to go find something like that.
After two months of being fucked around by an Australian supplier, I'm now running out of time to get the other 2/3rds of the rail I need. After yet more of scouring the internet, I was finally able to order the 40m worth of aluminium rail I need, from Switchcrafters in Yankeeland..

04/10/18
As driving the spikes directly into the sleepers would split them, I'll need to pre-drill every sleeper before spiking. On my first railway, this was done with a dremel and a single 1.5mm drill bit - as I built the track. Needless to say, this not only slowed construction to a crawl, but soon blunted the tiny drill, and eventually wore out the dremel entirely!
This time, I've ordered 30 drill bits in advance, so I can just throw them away as and when they blunt. My cheap, yet far more powerful drill press will do the drilling faster and more accurately than last time..
This is a jig based on one used on the excellent Sandstone & Termite Rly. This way, sleepers are marked for drilling very quickly and accurately. I don't bother making my jigs look good, as they're generally only used once or for once batch, and in this case, I just don't have time for such nonsensical luxuries.

Each sleeper was seated against the corner of the jig, to align it, then pressed onto the nails.

Four drilling points marked, and the sleeper was thrown into a box of 1-200 sleepers, and taken downstairs to the garage for drilling. I fucked up the exact placement of one nail on the right side. They're too close together. Driving the nail in on an angle, going under the rail to meet the hole, though, usually isn't an issue.

10/10/18
First section of track assembled. To save time in the tedious process of building track, most sections have had only every second sleeper fitted. This way, each meter takes 30 minutes to build, rather than nearly an hour. After this is all over, I'll go back and fit the remaining sleepers..

19/10/18
I've now used up most of my original rail. Some shorter sections of track have had all their sleepers fitted. I'm just hoping Customs doesn't send me an "import tax" ransom note for the rest of the rail. It's not my fault nothing is made here so everything has to be imported.

22/10/18
I'd been holding off on building points, because my last handlaid points were hopelessly unreliable. I saved up a pile of cash and was hoping to find some points (and extra track for sidings) for sale at the Open Day/Buy & Sell last Saturday, at AMRA's Zillmere branch in Brisbane.
Holy hell, did I get very lucky. A member there, Wayne, was moving into 7¼" ride-on stuff, and selling off his impressive G scale collection - which was priced to move.
Thanks to my friend Glenn, without whom I couldn't have brought all this home, I wound up with 10 sets of points, plus 22m of Accucraft brass code 250 track. For just about $450.
This is an absolute lifesaver, it'll save so very many hours and energy I don't have, in scratch-building and troubleshooting pointwork. The flex track will more easily get around any obstacles in the cutting..

Seven of the points are handlaid. Most of them will need re-timbering, but that's absolutely no issue. Besides, they cost me less to buy, than they did to build a decade ago.
The plastic-sleepered points are a left/right pair of Peco 4ft radius, and an Aristo stainless steel wye, in code 332. I ended up giving the wye to Glenn as a thank-you for going so far out of his way to help me get the track.
All the points were given an initial clean with a pressure washer. It actually removed a few of the loosest sleepers..

While the points dried, I got back to building track.
First, every second sleeper to be fitted (every fourth really) is clamped to the spacing jig. This will hold the track in place for the time being.

Starting with the rail opposite me, I start spiking it down with a hammer and punch. The clamped sleepers are done first, followed by the loose ones between them. Depending on my drilling accuracy, most of the spikes' shafts are a snug-to-tight fit about the sides of the rail foot.
This helps keep the rail and sleepers squarely in place, until the spikes start rusting outdoors and really lock it all together.

After the first rail is all but spiked down, the process is repeated for the other rail. The gauge jigs are used every 6" or so, to make certain the gauge doesn't waver more than is acceptable.

Sometimes, due to my jig being less than perfect, and the inevitable mistakes in manual mass-production, the a hole or two isn't in perfect alignment. So the nail is just driven straight into the sleeper, without a pilot hole. I've found I can get away with up to two un-piloted spikes per sleeper, without running the risk of splitting the wood.
Those "chomps" in the rail foot where the old spikes pulled though, look pretty bad right now, but they'll all but disappear when the track is eventually permanently installed on the next garden railway..

Another consideration for the track's next permanent use, is trying to combine the good sides of both sectional and flex track.
So I don't build most sections arrow-straight. Let the track bend back and forth a little bit, to give it some variation. This way it avoids looking like a sectional train set, instead meandering, bucking and jolting slightly, as a narrow-gauge line would of course normally do.
As the rail is was originally cut and curved to fit the available space last time, it's all of different lengths. When I get all the track finished, I'll trim it all down flush in one work session, to save time/energy.

There were a shitload of shorter leftovers from the last railway. Most of these won't be used for new track, as it would use up a lot of expensive rail joiners for not much extra track length. I'll keep them bundled for future use in structures and detailing..

After a few hours building straight-ish track, the points had dried out.
Because the points were originally used for track power, they still had some bits of feeder wire attached. A pencil torch worked well to remove them without melting any surrounding plastic sleepers.
To save time on the wooden points (which are to be re-timbered anyway) the larger butane torch was used, disregarding any charring.

I decided to wet my feet re-timbering the second-most-rotted point. A lot of the sleepers look like driftwood. I'm not sure what timber was used, but they've had a good long life, and all the metalwork is serviceable and very nicely made. The point throws on these were made by Wayne, with cast brass frogs and point blades bought in. Proper spikes were also used.

While the point throws are functional and better-made than I could manage, I'll be replacing the counterweights after this is all over. I believe these are lead fishing weights, and every time I see them, I think of marine buoys. Each to their own, of course.
At the same time, I'll also paint the point throws white, and the rails a rusty brown..

I'm replacing every second sleeper initially, to ensure all the rails remain in alignment. The spikes were cut off with the dremel, which allows the sleeper to drop away from the rails.
Despite this, I'm going to try and pull out as many spikes as possible, rather than cutting them. They're very close to being perfect scale dogspikes, and being rusted steel, their colour and texture is already spot-on. I'll save as many as possible, and use them in detailing future navvy rollingstock and buildings.

23/10/18
Using a short section of handlaid track as a template, the length for the new point timber was determined and marked on one of the long sticks of cedar. It was then thrown in the bench vice and cut by hand.

The difference in spacing and length of sleeper is obvious. The re-timbered points will reflect this, so it all matches.

After cutting, the nail holes were marked out for drilling.

Over to the drill press for a moment..

..And spiked home.
The rails have been painted at some point, and have come to look really good with age.
Eventually I'll repaint all my rail in any case, but this has me thinking. I might try putting a lighter rust-coloured wash, over the top of the initial dark rust-coloured coat, to bring it out like this point has weathered over time..

I decided it would be easier to determine the length of point sleepers, if I made another jig. So I've taken an under-length mistake sleeper, and cut grooves in it, so it'll sit over the rails.
Because of it's under-length, only one end matches my existing track sleeper length, so it was marked with the dremel.
It was then coloured with permanent marker to differentiate it from the other sleepers.

With some sleepers, it was found easier and more accurate, to drill them in-situation. Out with the all-or-nothing hand drill.

Unmodified nails are great for spiking both guard and running rails together.

Three hours later, the point is re-timbered and ready to go. I don't have time to properly test trains on it, but a light bogey happily glides right over it at any speed, that's good enough for now.

24/10/18
I ended up with a few more than enough rail joiners, still attached to the flex track. A torch and pliers were used to remove them, along with any bits of power feed wire. The joiners were then cleaned in citric acid, as my old ones were.

I've used up all my old aluminium rail, so can get on with trimming all of those sections, along with the brass flex track. Careful use of the grinder with a cutting disk makes the job go a lot quicker than a hacksaw. The dremel with a sanding disk was used to deburr everything.

Many of the flex track's sleepers have had a hard life in the Queensland sun, becoming quite brittle and falling off the sleepers. I'm not complaining, especially as they were only about $10 per length, but I will need to be careful with these.
They're just good enough to re-use, but I'll keep them out of the sun where possible. Some lengths are virtually new, however. In any case, it would only cost about $2-300 to replace all the sleepers with Micro Engineering ones. Something to think about in future..
These were damaged by the torch when removing wiring and joiners, but they were life-expired anyway.

That's finally all my current track (excluding point re-timbering) almost finished. They just need joiners fitted, but like the other steps in the process, I'll do that once all the track's ready.

26/10/18
Just over a month to go, and the other 40m worth of rail has finally arrived. Thankfully it's escaped the thieving clutches of Customs, no less.

Most days, I'm still putting in another hour or two making dogspikes.

And/or marking and drilling sleepers.

28/10/18
I figured it would be wise to prepare the site ahead of time, to make things more manageable on the day of set-up. It's rained earlier in the week, and the mosquitoes today are absolutely horrendous. I'm going to need to buy some much stronger repellent..
I've brought eight buckets of gravel to drop off (and free them up for refilling), and two 5ft lengths of flex track to help in surveying today. Additionally, a shovel, handsaw, and some pavers in case any substantial track supports are needed.
The track will begin just behind and to the left of the camera position, about 15 yards away from the street. A balloon loop and sidings will be built at this end.

A lot of fallen trees and branches are to be cut and moved, and plenty of long grass and sword ferns to be pulled out, making a corridor for foot and rail traffic to pass through.

I really should've pulled out a lot more grass here. This corridor isn't nearly wide enough for both track and feet (without substantial risk of people standing on it, anyway. This would cause additional problems during set-up a month later..
My tape measure only goes up to 8m/26ft, so I'm using offcuts of old aluminium rail as datum points, to measure the actual length of track it would take to negotiate the obstacles of the old roadbed.

The turn-around point is about 30m into the cutting proper. A balloon loop will be built here.

Beyond that point is a slippery quagmire of clay and mud. If it weren't for this, I would've liked to have gone further. That said, building and buying all this track is costing enough money and energy as it is.

In the 15 years since the line was pulled up, this part of the cutting has filled up with about a foot of silt. I'm not sure where it's come from, but it'll make excellent ballast for my track here.
Upon closer inspection with the flex track I bought, I've realised nearly all of the track for this project will need ballast support of some kind.
Thankfully, between my stockpiled gravel and this silt, there's ample ballast to get the job done.

Where the line will run through the tall grass, there's a concrete pad surrounding a fibro culvert pipe, buried a few inches under the ground here.
Over the years, this concrete appears to have cracked and shifted, likely from all the rainwater running into the cutting. As a result, the trackbed steeply climbs then falls rapidly here.I've poured out a couple buckets of gravel here, to lengthen and smooth out the hump.
I've got all day to do the site prep, so I really shouldn't have done such a half-arsed job pulling the grass here.

A few yards East of the concrete hump, I've taken to just dumping a bucket of gravel or two every few yards, to be used where needed to build a long, smooth grade from the balloon loop, to the top of the hump.

I forgot to get an accurate measurement of the trackbed here, so I don't know what radius the balloon loop needs to be built to fit. It looks like 6ft in the photo here, but it may actually be more or less than that, and I may even be able to do a little more digging and clearing, to make space for a wider radius. I'll have to come back some time soon and measure the area. More on that later..
I've not found any need for substantial track support besides ballast, so I'm leaving the pavers I brought here, as route markers, to let me know where exactly to lay the track in a month's time. I can't imagine why anyone would normally come in here, and they're only 90c each, so they should be safe.
29/10/18
I've decided to build some track panels curved, to make it easier to set up the two balloon loops on site. The curved panels will of course be used on the next permanent railway one day, so the radius can't be below my new minimum of 4ft. (8ft diameter)
My last railway was all 2ft radius (4ft dia.) curves because the house was a duplex with a tiny back yard. Even with little 12" long wagons being pulled by an Accucraft Ruby, this looks bad - never mind the fact my Fowler "Victoria" would look utterly ludicrous on that radius..
I used the program SCARM to print out some templates of Piko sectional track, for use as guides to build jigs for several radii of curve. I'll build three jigs: One for 3ft, 4ft and 5ft radius; being 6ft, 8ft, and 10ft diameter respectively. Hopefully I won't need the 3ft radius jig, but it'll be there just in case that cutting is in fact only good for 3ft..

The printouts were taped together, clearly marked with their respective radii, and glued to a scrap piece of 6mm MDF.

After that had dried, some scrap pine strips were broken up to make sleeper spacers, their positions on the jig carefully measured and marked before gluing down.

It's crude, but it's quick and cheap to build, and accurate enough for what I'm doing.
There's no point covering the construction of the curves, as besides easily hand-bending the new rail to match the printed jigs, building curves is virtually identical to building straights.
In the end, I did unfortunately have to compromise my "Minimum 4ft radius" rule, and build the cutting balloon loop to 3ft radius. A subsequent visit to the cutting revealed that it wouldn't be worth the extra precious setup time, to get what would only be another foot of diameter from this loop.
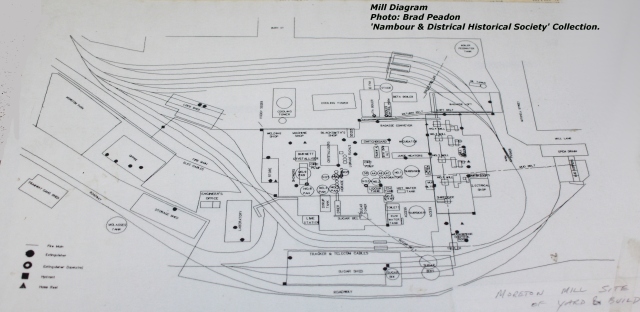
The 3ft curves can still be used on the next railway though, either as part of a tightly-curved logging branch, or as a bin-unloading loop encircling a sugar mill complex, Moreton Mill style, on the future permanent garden railway..

14/11/18
When I bought the Peco joiners, I saw that they were for code 250 rail, and anticipated no incompatibility between them, and the rail I have. Never having owned any Peco track before, I didn't realise the foot of their rail, was narrower than that of nearly all other code 250 rail available.
Quite annoying.
The solution was to grind down the width of the rails' foot, at the ends of each rail, to fit into these joiners. Most of the panels made with the new rail were treated thus, using up the Peco joiners, with about half a dozen of them left over as spares.
Four "transition" track panels were made, with the rail ends ground for Peco joiners at only one end of the panel - the other end having the standard broad-foot brass joiners.

The feet were narrowed with the bench grinder, very carefully so as not to touch the rail heads, or remove too much of the rails' feet.

This of course left behind burrs, which were easily removed with sanding disks in the dremel.

The joiner is then tapped gently against the floor to fit. Most of the rails needed additional grinding/deburring to make for an ideal fit - which of course, is tight enough for the track to not come apart in use, but not so tight as to make disassembling the track difficult.

Completed track is stored outside. The balloon loop sections have been made and stacked on top, with most of the new rail still left to make straight panels. Not far to go now..

23/11/18
Taking a break from building track, I expect I'll be needing something to hold the track down and in place. I've had success using tent-peg-type hooks here and there on the last garden line, so I'm making enough for this whole setup.
Some 6mm steel rod was bought and cut into 8" lengths. They were then formed into simple hooks with a club hammer and the vice.

28/11/18
Finally. Finally, all the track is done and ready - with under three days before setting up on site.
Besides the curved track panels at the top of the stack to the left, all the new-railed track is on the right.

Can't remember how many hooks I ended up with, but it should be more than enough..

29/11/18
I've made some quick and dirty signs from scrap timber and cheap paint, to remind people my track isn't elephant-proof. Those aluminium rails would bend beyond repair if stepped on..

01/12/18 - 10:23AM
Car's packed, including everything needed to camp onsite tonight, as I don't want to leave thousands of hours and dollars of work unattended on public land overnight. To be fair though, I highly doubt anyone could want or need to go in the cutting at any time of day.
I was hoping to leave sooner, but as someone who can't drive, I honestly just appreciate the lift over to the cutting.
Annoyingly, I've had to cough up another $70 for a battery angle grinder, to make just four cuts in two sections of flex track, to build the balloon loops. A hacksaw was considered but would've caused more problems than it solved. A few more buckets of gravel are also being brought, in case they're needed.

10:45AM
The first thing to do was to clear the leaves away from the track's route, for a solid footing.
Next was to set up mozzie coils every 10-20m or so, on aluminium foil trays, to keep the leaves from catching fire.

11:53AM
I decided to start at the East end with the balloon loop. Despite working as quickly as possible, it's taken me over an hour just to get this loop laid out, and some preliminary track leveling done.

2:18PM
By now, the balloon loop was built, ballasted/packed mostly with silt, and I've started moving West. Immediately after the points of the loop, I've switched to the flex track to try and make up for the slow start, and get around all the plants here. I've used three lengths (15ft/5m) of flex so far.
I'm testing and fettling the track as I go along, with several wagons pushed around at various speeds/directions. So far, it's all pretty good with both bogey and four-wheel wagons. The silt is being used for most of the ballasting, moving shovelfuls from the bottom of the balloon loop.

The points were supported mainly with gravel, then silt was packed into everything to help lock it in place. Packing was done frantically with fingers, which of course soon became quite painful.

The track is staying down on the ground very well by itself, so I've only had to use one hook so far. It sticks up far less than it looks, maybe 3mm above the railheads at most.

4:34PM
Having used up all but one length of flex track, I'm over the concrete culvert hump, and have only about another 25m of straight track to go, before the sidings and balloon loop.
Someone promised to lend a hand from midday till 3pm. They fell asleep and didn't arrive till 6pm. They knew I rarely ask for help unless I'm truly desperate. I knew ahead of time there's no way I could get all this track laid, tested, and fettled in a day, by myself.
There was no time to stop for lunch, or even ring the missing helper to find out where they were. Granted, it wouldn't have cost any more then three minutes to call them, but I frantically kept at it, expecting I'd have to work by fire-light well into the night to get it all done.
However, I was aware my friend Glenn may be stopping by in the afternoon to say hello, if he gets the time. He arrived at about 3, and offered to help for a while, which of course was gratefully accepted.

5:21PM
We've almost finished laying the main line. The storage sidings are now being laid out. The yellow rubbish bag is hanging from the tree to stop it blowing away.

I've suddenly remembered to get another photo or two at this stage.
Glenn had a small four-liter bucket in his car, which proved very well suited to bringing silt from the East balloon loop area, to the rest of the track.

Running downhill from the culvert, the gravel's been used to good effect smoothing out the grade. It doesn't look like it, but the gravel's been packed under the sleepers, and the track is surprisingly solid.

6:54PM.
My promised extra set of hands only arrived an hour ago. Glenn stayed until just a few minutes ago. Thanks to him, I might actually get this thing done in time..
Nearly all of the remaining track, including most of the West balloon loop, has been laid out, and the mainline up to the storage sidings has been ballasted and fettled.
At this point, I'd been working nonstop for over 9 hours, and had more than enough of this shit. I decided to go home, have a shower and sleep in an actual bed, leaving the track and two plastic gondolas onsite overnight, returning at about 5AM tomorrow. A big risk, to my mind, but at this point I simply don't much care.

02/12/18 - 9:54AM
After a sleepless night (always had problems sleeping), I've been here since half-past-five, and have just barely made it, with half an hour to spare.
I ran a quick test train of four wholestick cane trucks and my 0-4-2T "Baron", a heavily modified Accucraft Ruby. To my utter amazement, there was just one bad spot in the track, which was easily solved with a few handfulls of silt ballast. Besides that, the train made it around the entire track once, before running out of gas early, as sometimes happens when the gas can is too cold to start with.
For the rest of the day, "Baron" and those trucks stayed in the siding. A huge shame, but I just don't have the energy to run steam today.

The West balloon loop was, like the rest of the track, just plonked down on the ground, then packed up and levelled with mainly silt.
I've also set up a pair of trestle tables, and have chips and drinks ready for whomever shows up.
At this point, I just wanted to sit down and have five minutes to rest. Then someone from the newspaper showed up. Not sure who tipped them off.. Thankfully, people started arriving soon after and I was able to stop for a bit.

The Baguley and cane bins were brought out, as the fellow from the paper (can't remember his name) wanted to photograph them. I only put six of my ten bins on, as I was concerned about the loco's running time due to teething issues with the battery pack. In hindsight, the full rake would've been fine, and have would've looked a lot better.

Over the four hours, I only spent an hour at most, running my own trains. One has to follow their train here, due to the constantly-dropping leaves needing to be cleared off the track before the train derails on them.
I did however take plenty of photos and this video.


Steve brought AMRA Zillmere's club loco "Eric", a Roundhouse Katie.

Ben's Queensland Railways DH shunting loco, partially completed.


It was great to see a model of a Moreton Mill loco running on Moreton trackbed.
This is Steve's coal-fired model of Petrie, a 1933 Fowler, the mill bought secondhand in 1960.


The only other loco I ended up running was the Malcolm Moore and rake of Binnie skips.
Something makes me think I need more skips..

The smoothed-out hump looked worse than it was.

Glenn's tram loco, built to the "Ellie" design outlined in Australian Model Engineering magazine.


Running finished up at about 2pm, which couldn't come too soon. By 4pm I went to bed, and it was all finally over. People occasionally ask when I'm doing it again, and I'm pretty sure they're serious. I suppose I'm glad I was able to get it done, but it's not something I will ever repeat.
Even this write-up was a bit of an ordeal. It's taken almost 4 months to write, because I lost the file when it was nearly done, and had to start over.

A huge thanks goes to those who helped make it all possible, I couldn't have managed this without your help. And thanks to all who attended, I hope you had a good time.