Despite being a devout steam man I've long wanted a non-steam locomotive for my garden railway, but could never find anything I like.
Enter one of the few non-steamers I'm keen on.
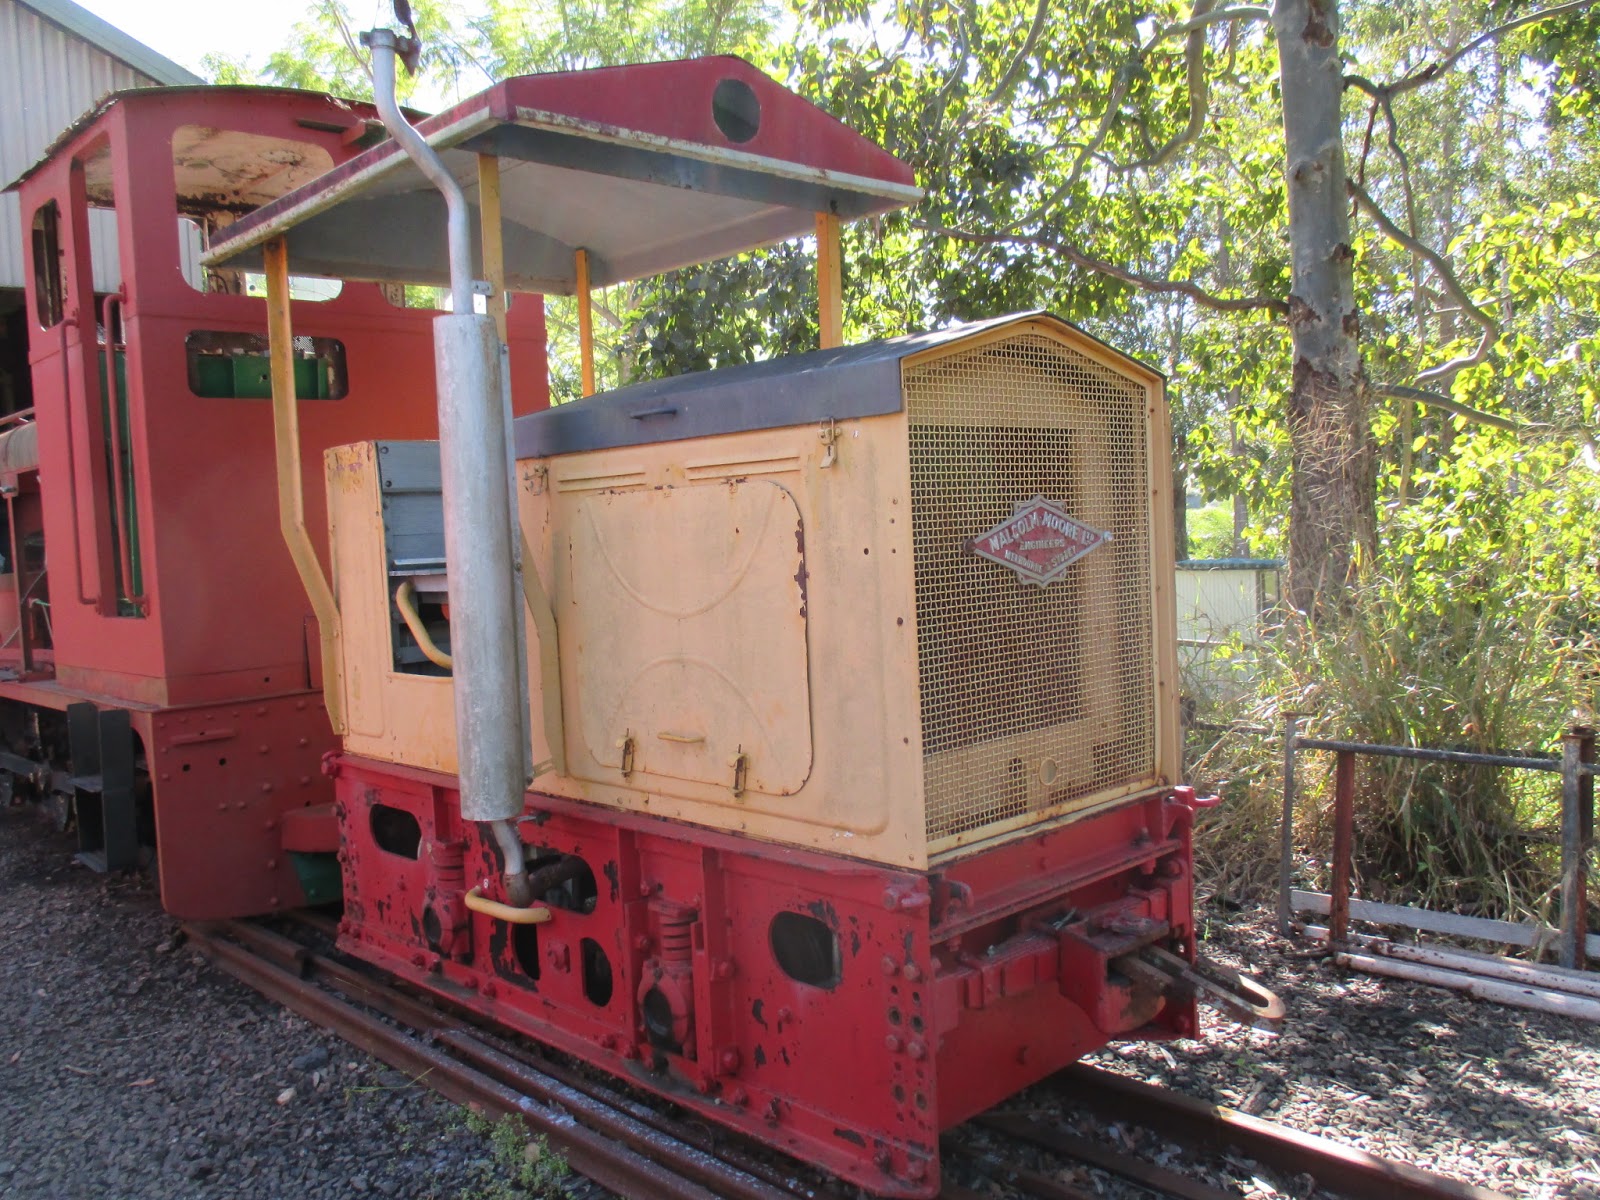
The 2ft gauge Malcolm Moore 0-4-0 petrol-mechanical locomotive. 92 were built by Malcolm Moore Engineering in Melbourne, Australia, for the Australian Army in WWII. They were for moving supplies and munitions around bases, etc..
After the war, many were sold off to industrial concerns, including a number of sugar mills in Queensland.
I couldn't find any model locos that I liked enough to buy, so I eventually decided it had to be a Malcolm Moore.
A mob called Tootle engineering used to sell 'Moores in 32 & 45mm gauges, but those quickly sold out years ago, so scratch building was the only option.
I wasn't confident to build the thing entirely from scratch, so after months of searching, I finally found a diesel loco kit from IP Engineering. I intended to simply modify it, but wound up building the loco almost entirely from scratch anyway..
At ANGRMS Woodford, we have three of these locos. Two of them were bought essentially "new-in-box" directly from the Army in the 1980s.The other is ex-Moreton Mill's "Jimpy".
My garden railway is modeled as 3 foot gauge, so I'm building this loco as a plausible 3 foot rebuild of a Malcolm Moore.
My garden railway is modeled as 3 foot gauge, so I'm building this loco as a plausible 3 foot rebuild of a Malcolm Moore.
This is what I'm starting with. The IP Engineering Alan Keef Ltd. K40 kit. I ordered the cabbed version to save myself
building some of the cab roof parts. Turns out I'll still need to make
most of the roof parts anyway..
The kit made of CNC machined plastic, with some whitemetal castings. This is also my first experience building with plastic, other than HO scale kits.
Apologies for the low resolution, there aren't many photos of this loco around, so I had to use the one from IP Eng's site.
The kit made of CNC machined plastic, with some whitemetal castings. This is also my first experience building with plastic, other than HO scale kits.
Apologies for the low resolution, there aren't many photos of this loco around, so I had to use the one from IP Eng's site.

10/07/15
Unfortunately, they sent me the open-cabbed version, and instead of the extra axleboxes I ordered, I got a third set of couplings on top of the two coupling sets I had ordered.
I knew IP Engineering has a reputation for sometimes getting the orders mixed up, but I also knew they always make it right.
I sent them an email letting them know I had recieved the wrong thing, and they duly sent out an entire replacement order free of charge, and said to keep the original order!
So now I have both the open and cabbed locos, 5 sets of couplers, and the set of axleboxes that (due to a change in plans) I no longer need!
I will use the axleboxes and 6 extra couplings on future rollingstock projects..

I
started with the laser-cut MDF chassis. The loco comes as 2-wheel drive
so the power is pretty limited. I'm hoping I can add enough weight to
the loco to let it haul at least 2 bogey wagons, or 6 cane trucks.
I shortened the wheelbase to the right length after this photo was taken.
I shortened the wheelbase to the right length after this photo was taken.

The headstocks/couplings are nice heavy whitemetal castings. I ended up cutting down the width of them to fit the scratchbuilt outer frames.

The
original dummy axleboxes from the K40 loco kit. I butchered these in a
failed attempt to make 'Moore axleboxes. I ended up using the the
'coil spring' parts of the castings for the springs on the loco. Cut-down machine screws also make good dummy springs.
The butchered remains didn't go to waste, though. I kept 'em in my lead offcuts box and eventually melted them down for some homebrew castings..
The butchered remains didn't go to waste, though. I kept 'em in my lead offcuts box and eventually melted them down for some homebrew castings..

15/07/15
My preferred method of taking measurements - a camera, ruler and measuring tape. Doing it like this saves me from having to sketch everything I measure from every angle. It also save me from forgetting to sketch this or that, and having to return for more measurements.
The measurements and reference photos I took can be found here.
When I'm ready to start marking out the plastic, I take my measurements and scale them down to 1:20 using this free online scale conversion tool.
The measurements and reference photos I took can be found here.
When I'm ready to start marking out the plastic, I take my measurements and scale them down to 1:20 using this free online scale conversion tool.

24/07/15
I know the Dremel and filed out holes in the frames aren't perfect, and there are many small inaccuracies, but for once I'm pretty happy with my efforts. The later purchase of a set of needle files greatly improved the frames.
I know the Dremel and filed out holes in the frames aren't perfect, and there are many small inaccuracies, but for once I'm pretty happy with my efforts. The later purchase of a set of needle files greatly improved the frames.
The side frames are the 1mm thick plastic sheet included with the kit, Evergreen styrene strip & angle, MENG dummy nut/bolt heads, pop rivet heads and 1x1 Lego flat tiles for the axlebox covers, and axlebox bodies respectively.

The original kit bonnet parts are mocked up in place with Blu Tac. Still not sure if I'll use them or make my own. I also printed some research pictures and tacked 'em on the wall behind the workbench, not something I usually do, but I found it helpful.

28/10/15
3 months & 3 days have passed since I last worked on the loco, but some progress has been made. The dummy side frames and whitemetal headstocks were assembled to the motor chassis, then I made the main side panels and rear "bunker" ends. Mocked up here with blu-tac.
The peaked bonnet parts are from the K40 loco kit. They are currently being modified to suit..

Various plastic parts & the yellow bodywork paint have been acquired to spur myself on, and the Malcolm Moore builder's plate is on order from Narrow Planet.

02/11/15
Front grille has been made and mocked up in place.
Front grille has been made and mocked up in place.

13/11/15
I originally planned to use the 2AA battery holder that came with the IP Kit, but it wouldn't fit in the new bodywork.
I then tried to find a rechargeable battery pack to permanently mount in the loco, thereby avoiding the inevitable wear and damage from having to dismantle and reassemble to loco to recharge normal batteries.
I couldn't find any ideal battery packs in the end, so I had to buy a two-cell AAA holder which JUST barely fits.

11/12/2015
When I glued the bodywork together, I used Plastruct Plastic Weld. This stuff is really good where you need a quick bond with high strength.
It literally melts the plastic and 'welds' the parts together. Unfortunately, when the plastic re-solidifies, it shrinks, causing the reletively unsupported body panels to bow very badly, as shown here. The solvent cement is great for my HO structures, however. If you're assembling plastic kits in the smaller scales, I'd definitely recommend it.
From here on, I will be using different glue for this loco.

The bodywork sub-frame was badly twisted as well, but was repairable.
The bodywork was dismantled and cleaned up to attempt repairs..
Both sides and one end panel turned out not to be repairable, so replacements were made.
The bodywork was dismantled and cleaned up to attempt repairs..
Both sides and one end panel turned out not to be repairable, so replacements were made.


5 hours later, and new sides and end panel had been made, sub-frame repaired and modified to accept the main power switch, and the cab floor fitted.
This was mostly glued with Revell Contacta, which doesn't cause nearly as much shrinkage. Superglue was used to reinforce things where a quick hold was needed. I have also received an email from Narrow Planet saying the prominent works plate is now on the way. Hopefully it'll encourage me to get the loco done, as there's still a long way to go..

The
hole in the floor is for a DPDT (Double Pole Double Throw) toggle switch. This is for Forward-Off-Backward control. This will
represent the unusual "pole handbrake" of the prototype, whilst still
being accessible and not too obtrusive in appearance.
The hole in the front wall of the 'bunker' is to accommodate the headlight switch, a SPDT (Single Pole Double Throw) on-off-on switch for directional lighting, independent of the motor.
This switch will represent the reversing lever mounted under the driver's seat. Same principle as above, accessibility without looking too bad.

15/12/15
Got a temporary rats-nest setup of the motor wiring, sans speed control, to make sure the basics work. Somehow, they do..

A cover was made up to keep the dirt and shit out of the otherwise open gearing. Held on with a pair of M3 screws, with nuts glued to the topside of the MDF chassis.

17/12/15
The worksplate's arrived. It was made using a photo I took of the plate on the Yellow 'Moore'
at Woodford.
It's 10mm X 24mm so pretty small. It's made from 0.5mm nickel-silver in a photo-etching process.
As of writing, it's currently between coats of red paint.
It's 10mm X 24mm so pretty small. It's made from 0.5mm nickel-silver in a photo-etching process.
As of writing, it's currently between coats of red paint.

25/12/15
I've given the chassis and body a light basecoat of red oxide primer, to reveal the flaws in the surface.
Then, I used a little fibreglass "bog" filler on the rough bits. The bog was sanded smooth and given another light coat of primer.
I've given the chassis and body a light basecoat of red oxide primer, to reveal the flaws in the surface.
Then, I used a little fibreglass "bog" filler on the rough bits. The bog was sanded smooth and given another light coat of primer.

The body has recieved similar treatment to the chassis.
Now, looking rather like a Groudle Glen loco on the Isle of Man, I've made and fitted the pressed out sides. 0.005" (0.13mm) styrene sheet was used for them.
Next, the flap on the rear end of the loco will be made, then the dummy doors and louvres on the sides of the bonnet.
Now, looking rather like a Groudle Glen loco on the Isle of Man, I've made and fitted the pressed out sides. 0.005" (0.13mm) styrene sheet was used for them.
Next, the flap on the rear end of the loco will be made, then the dummy doors and louvres on the sides of the bonnet.

31/12/15
The worksplate was sprayed red (no primer) and carefully sanded back with some fine wet-and-dry.

1/04/16
No progress on the 'Moore this year until now, but lots of little things have been done in this session.
The side doors, hinges and louvres were made and fitted, along with the top of the 'bunker' and the bonnet top, which is just a light press fit onto the body for access to the electrics.
The chassis has had the inital coat of red, which after the paint hardens, will be masked off for the sides to be sprayed black.
I've used 'Indian Red' enamel as a smoothing out coat this time as I'm nearly out of 'Grey Primer'.
Some of the bolt heads have been applied at the front of the bonnet at this side, but trying to glue the tiny bolt castings to the body is too painful for the amount I'll have to do.
I've ordered a set of tiny twist drill bits, and will insert short lengths of tiny styrene rod into the resulting holes and trim them down to represent bolt heads..

The
wiring was tidied up inside the loco, and some plugs fitted to make any
future dissassembly easier. On the subject of electrickery, the headlights
have been made (and the rear one partially fitted), using some optional bits
from a 1936 Ford kit bought for a future project. The rear headlight is on the opposite side to what the Army had originally fitted, as I preferred it on this side.
A fuel filler pipe has also been fitted, and will be capped with a spare from the Ford kit.
A fuel filler pipe has also been fitted, and will be capped with a spare from the Ford kit.

9/4/16
In preparation for an operating display at the Caloundra Model Railway Show, the 'Moore was given a coat of paint to make it presentable as part of the operating display. (My steamer Baron was in bits getting new eccentrics, behind the 'Moore in the photo)
The builder's plate is just held on with blu-tac at the moment.
The running display highlighted the 'Moore's very low haulage capacity, only 3 heavily underweight cane trucks. The loco hasn't been fitted with weights yet, and I'll be ordering some Delrin chain and sprockets to make it 4wd.
Bigger wheels (30mm, nearly perfect scale) will also be fitted as the frame sits too low and catches on points and uneven rail joints...

20/05/16
The dummy bolt head detail has been finished (although they look more like flat rivets), along with a cheap PWM (Pulse Width Modulation) speed controller fitted to the cab, 4wd conversion and larger wheels.
The dummy bolt head detail has been finished (although they look more like flat rivets), along with a cheap PWM (Pulse Width Modulation) speed controller fitted to the cab, 4wd conversion and larger wheels.

20/05/16
I fitted Delrin plastic sprokets and chain, and replaced the original 20mm wheelsets with 24mm ones. Great fun cutting the MDF frames to get the old wheels out. Even more fun gluing the bearings back in afterwards - not..
I ordered some 30mm wheels but when I mocked them up under the loco they didn't look right at all. Weird, considering the prototype's wheels are 30", and a millimeter is about an inch in this scale. Thankfully, I'd also ordered a coach kit that happened to have 24mm wheels which were to be replaced with bogeys.
The 24-millers look right under the loco. Now it sits at a good height and it'll actually go round my track with them.
Not tested the loco's power or battery life just yet...

The electrics are really packed in here! Only thing left to do electrically, is wire in the front headlight once I finish making it..
A piece of styrene was cut to fit behind the grille, and some black fabric from an old shirt was attached to one side with spray adhesive, and trimmed to fit. This hides the internal workings and the pattern of the cloth looks like a radiator.

25/05/16
The front headlight bracket has been made and the headlight installed. I decided to fit the front light in it's original Army location, rather than in the roof (a common later modification) which would make concealing the wiring harder.
The dummy bolt detail on the body has been given tiny slits in the ends to resemble screw heads. Yes, I'm that sad. The driver's seat was mocked up in place.
The loco was tested with the open and covered wagons. Two bogey wagons or equivelent is all I want it to pull, and it does this nicely.
The loco is fairly slow however, with the top speed being my preferred 'cruising speed'. Another AAA battery in the circut would be good but I highly doubt I'll find the space for it..
The loco is also a bit 'slippy' on the rails pulling just one wagon with a small 12V lead-acid battery, so will need some lead added under the chassis..


04/11/16
Ok, I've been putting off doing the roof for waaay too bloody long.
More work has gone into the loco over the last few months. Lead added to the chassis has remedied the traction issue, the cabin interior was painted, driver's seat finished and a driver bought and painted.
The roof struts were made with 3mm styrene angle and cut where bends were needed. The parts were clamped down and the gaps filled with precise applications of superglue.
Painting is underway..

The
roof is made up of 18 parts, with a lot of sanding and coats of paint
to ensure a smooth finish, making it look like a welded fabrication.
Currently between coats of paint..
Currently between coats of paint..

07/11/16
Roof struts after primer, cleaning up the joints, primer again, and a white basecoat.

01/12/16
It's finally done. 1 year, 5 months and 19 days it's taken me, as it turns out. Very happy with it. It'll get some light weathering later on..
It's finally done. 1 year, 5 months and 19 days it's taken me, as it turns out. Very happy with it. It'll get some light weathering later on..

The rear headlight has had it's mounting brackets added, and painted.


The driver came from Evilbay. He does make the controls harder to get at,
though. He's held in with blu-tac, so can be removed when needed.
Like the prototype, the roof is very flimsy, but there's nothing I can do about that, unless I find some brass angle of the right size.
As long as I'm careful it should be fine though..
Like the prototype, the roof is very flimsy, but there's nothing I can do about that, unless I find some brass angle of the right size.
As long as I'm careful it should be fine though..

I've somehow managed to squeeze another AAA in there for 3.6V, which should give it enough oomph to pull a load on most tracks. I've added a handle made of copper rod to the battery clip, so I can actually get it in and out.
This however made the 3V headlight bulbs much too bright, (and potentially melt the plastic front headlight case - rear is aluminium) so after some research, I fitted a trimpot to fine tune the voltage getting to the bulbs. Very touchy adjustment but it should be ok now..
This however made the 3V headlight bulbs much too bright, (and potentially melt the plastic front headlight case - rear is aluminium) so after some research, I fitted a trimpot to fine tune the voltage getting to the bulbs. Very touchy adjustment but it should be ok now..

11/07/17
After only a few hours of running I'd decided that the original location of the speed control knob was way too impractical to use, so the speed chip has been relocated to a vertical position in the bonnet, and the knob will be replaced by a dummy air filter machined from aluminium.
I figure the loco would've had the original Ford flathead V8 replaced with a bigger, more powerful diesel engine when it was converted to 3ft. That's my justification for an air filter anyway.
The orange plastic centre of the knob was carefully hacked down to size, and will be glued into the aluminium part. This way, it'll be be removable from the speed control shaft, so as to enable the bonnet to be removed for swapping out batteries.

Unsurprisingly,
the original styrene roof struts broke during transit to the Moore's
first outing and many times subsequently (with absolutely fuck-all handling I
might add) so I ripped off the old struts, bit the bullet and bought
some 3mm brass angle on evilbay. 2mm is actually the scale-correct size, but I'd rather go slightly overscale and not have it break all the time.
I will cut and solder this stuff to make new roof struts, then epoxy them on with reinforcing track nails like the styrene ones had.
I will cut and solder this stuff to make new roof struts, then epoxy them on with reinforcing track nails like the styrene ones had.

01/08/17
The 'Moore's new brass roof struts are fitted, much stronger now.
The speed knob disguised as an air filter was machined from aluminium, etch primed, painted with engine enamel and baked in the oven. Hopefully this'll slow the paint wearing off with use.
The silver band on the 'filter' is a strip of duct tape, which just happened to have a perfect texture to it.
The speed knob disguised as an air filter was machined from aluminium, etch primed, painted with engine enamel and baked in the oven. Hopefully this'll slow the paint wearing off with use.
The silver band on the 'filter' is a strip of duct tape, which just happened to have a perfect texture to it.

The loco also now has it's own padded case; One of those heavy-duty black plastic things with the perforated foam insert, that can be shaped to fit the item securely. They're expensive, so I try to wait till they're on special at places like Supercheap Auto..

02/09/17
With the Moore having been finished and a carry case bought, it was finally time to take it down to Woodford and get the obligatory photos of the model sitting on the real thing.
With the Moore having been finished and a carry case bought, it was finally time to take it down to Woodford and get the obligatory photos of the model sitting on the real thing.


Apologies for the glare on this one.

I'd say my first major plastic scratchbuilding project's come out pretty well. Turns out plastic is a pretty easy material to work with, so
much so that I've taken to calling it "The Cheater's Material".
We have a couple of other small infernal-combustion locos at Woodford, and I'm already thinking planning on doing 3ft versions of those..
We have a couple of other small infernal-combustion locos at Woodford, and I'm already thinking planning on doing 3ft versions of those..
Excellent work mate you are so talented.
ReplyDelete