Another utterly enourmous album transfer from Farcebook
The extension of the Anzac Creek Tramway Mk.I
At my disastrous first open day in 2014
it was suggested to extend the line. I dismissed the thought for a
while but I knew of course it was going to happen at some point..
Fast forward to June 2016 and I've decided to do it. (After permission was granted)
Fast forward to June 2016 and I've decided to do it. (After permission was granted)
28/06/2016
The current bridge over Anzac Creek (in black) will be removed and the creek filled in.
The red represents new track, which will meet at a set of points near the loco shed, Thus making the original Anzac Creek Tramway a ballon loop for this end of the line.
The wagon storage siding will have approx. 15" taken off it, to make room for the new mainline.

I started work by digging a trench for the timber edging near the current layout.
The original timber edging will be cut down to meet the new edge.
The new Anzac Creek will be in the new section, this time with running water.
The original timber edging will be cut down to meet the new edge.
The new Anzac Creek will be in the new section, this time with running water.

After passing behind/through Mum's little rainforest, the line will form another balloon loop around this tall tree, with a sugar mill complex to be built behind the tree in the corner of the yard.
Cheap plastic track is being used for the surveying.

A new station will go just behind the new peice of timber.

Trench for this section's edge dug. Timbers still need leveling and backfilling. I'm only using cheap untreated pine not only to save money in the medium term, but also because I suspect we'll only live here another 2-3 years. That of course begs the question - why bother with all this? Basically, I just need something to keep me busy.

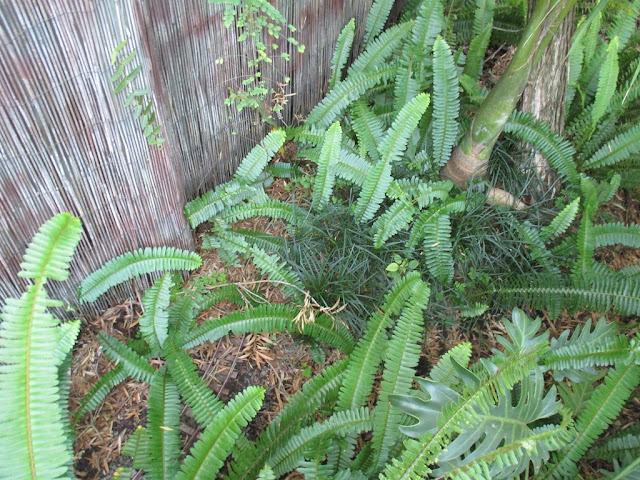
After an hour's work, I had 2/3 of Mum's rainforest moved away from the fence about 9".

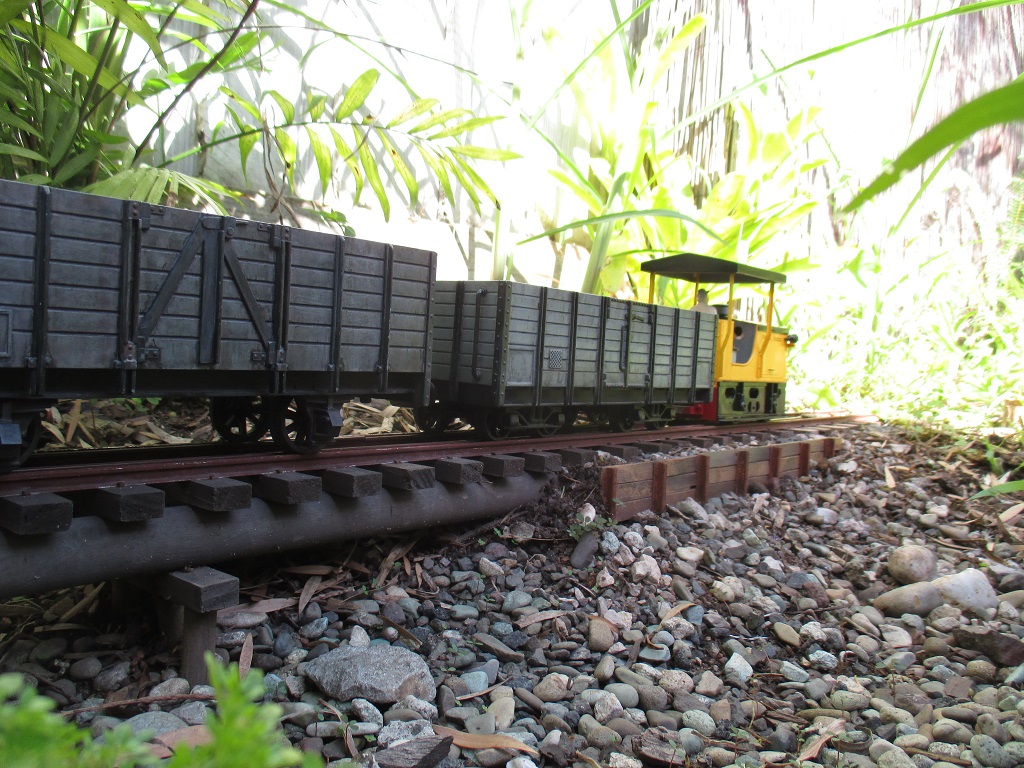
The track temporarily in place to get a feel of how it'll pan out.

The bamboo climbing frame had to be moved out from the fence and cut with a grinder to allow for the loading gauge. The cut ends will be disguised behind other plants..

This is as far as I got by the time it got dark and bloody cold..

29/06/16
I've cleared a path through the rainforest, and am proceeding with the rest of the track planning.

Yes, I am using plastic track for the majority of the extension.
Why? I don't have the time or energy now that I'm working full time, to handlay it all like last time.
This is Newqida track (basically a plastic clone of LGB). For the price it's pretty good for toy stuff. I've heard of this track lasting 6 months in 40 degree Sydney weather, semi shady conditions, unpainted and being walked on by kids, and came out of it completely unscathed.
I will be painting the rails, embedding the sleepers in the ballast, and the track will be in the shade for most of the day, save for early-mid morning, so I'm confident enough to at least give it a go.
I've bought four track packs, mainly for the points, and will need to order another one, to connect to the orignal line. About $140 all up including post.

Again, the red lines show where track will have to be handlaid and adapted to the Newqida stuff. I'm making sure all handlaid track will be straight sections, to save time and work.

Basic layout of this side. Mill buildings will come much later..

04/07/16
I've started the trackbed with the station passing loop. The roadbed is similar to that of the original line, except the gravel/cement isn't full-depth between the bricks, to save trips to the gravel source..

The line climbs gently from the North end of the passing loop..

..Until it reaches about where that straight section of track ends next to the black pot.

The new Anzac Creek has been started, with the roadbed on the South bank in place.
Sand is being used under the liner to help protect it.
This is a really cheap water feature, using a $16 12V indoor pump (Don't see why it shouldn't work long term, provided I keep it clean), sitting in a sump made of a 2L ice cream tub, then piped to the top with ordinary garden hose which I erm, "borrowed"
The holes in the sump for outlet pipe and power cord will be sealed with silicone.

For liner, instead of paying $50 for 2X3 meters of plant/fish safe, uv stablized liner, I'm going with the bottom of a 4 foot diameter $15 inflatable kiddie pool. It will be covered in concrete anyway so it just needs to be waterproof, and I don't want plants or fish in this little stream.

The pump is hooked up temporarily to test the whole thing before I start concreting. The low maximim output of the pump (200LPH) is quite adequate for me.
The pebbles are just there to hold the liner down, though I might get some smaller ones, these are a bit big. The creek will then be concreted, excess liner trimmed and the sump lid made.

08/07/16
I ended up going for some smaller pebbles, here I'm concreting the creek bed.
I ended up going for some smaller pebbles, here I'm concreting the creek bed.

10/07/16
The mill end of the line has had the leaves raked out, and some timber stacked to see just how much fill would be required to make it level with the rest of the line. Though I'm using the dirt dug out from the creek and trackbed, I'm doubtful that the excavated dirt will provide sufficient fill as there will need to be a fair bit here..
The mill end of the line has had the leaves raked out, and some timber stacked to see just how much fill would be required to make it level with the rest of the line. Though I'm using the dirt dug out from the creek and trackbed, I'm doubtful that the excavated dirt will provide sufficient fill as there will need to be a fair bit here..

Anzac Creek MKII is finished, save for making a foam filter for the pump inlet and fixing a siliconed hole I damaged. The North bridge abutment has also been installed.

The edges will be disguised with soil and mulch.

12/07/16
Working on the line after getting off work, from 3pm till 8 - with a half hour trip for more gravel thrown in..

The roadbed for the mill end balloon loop is finished and most of the surrounding earthworks completed. As there is a relatively large amount of track here, I actually have more than enough soil for fill.
The red and silver on the track is paint, sprayed over the track when it's in-situ to mark out where to dig the roadbed trenches.
The roadbed for the loco shed is yet to be done..

I needed a more permanent storage solution for the buildings, plus the yet-to-be-built buildings needed on the extension, so I made two new shelves to go over the doorway and loco shed display/storage area in my room. At this point, my younger brother and I were still sharing a room, hence the posters.

I didn't bother painting the top side of the top shelf as it'll never be seen.

14/07/16

18/07/16
The edging timbers have been marked, cut and assembled in place, then soil filled in round them.
The bark mulch has also been put in. Surplus mulch is on the blue tarp, covered from the weather.

19/07/16
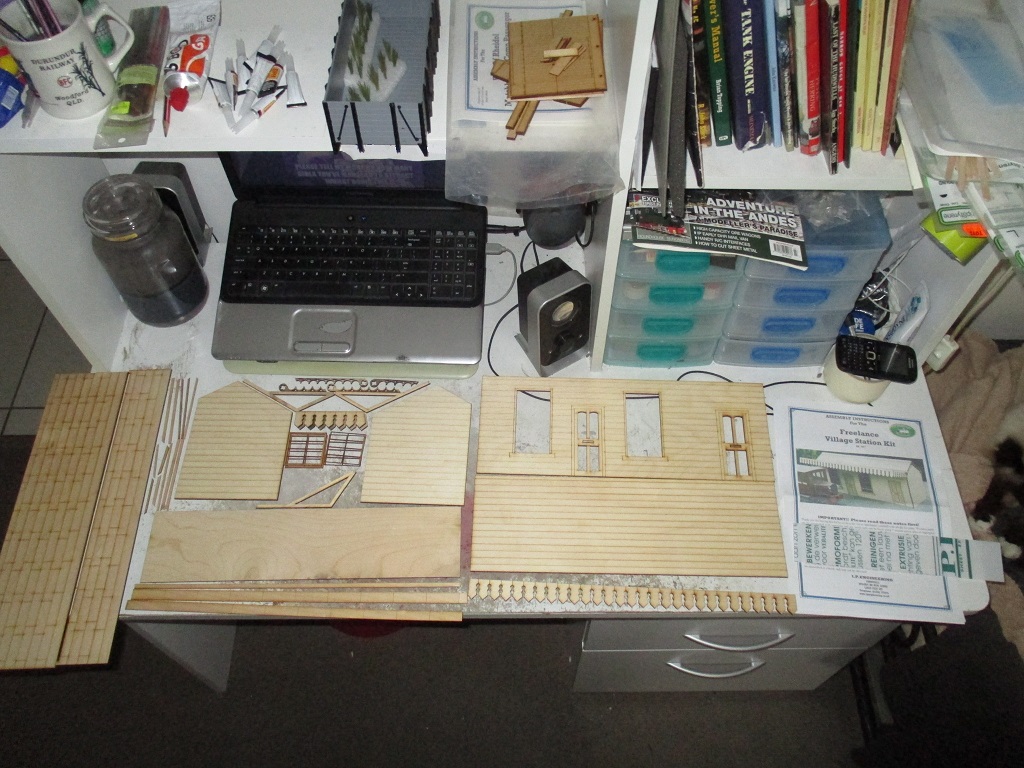
A laser-cut plywood station kit arrived from IP Engineering.
Some mods will be made, like a corrugated roof instead of the laser-scribed tiled effect. Interior lighting will also be a feature of all buildings from here on, with the older buildings to be retrofitted..

24/07/16
The first of the track has been screwed down.
Most of the balloon loop is now down, save for a 4ft long section which will be handlaid.
The aluminium rails have arrived from Argyle and await assembly onto some sleepers..

The loco shed spur and cane tippler loop are yet to be completed and fixed down.
Packing and leveling the track with ballast will then follow.


27/07/16
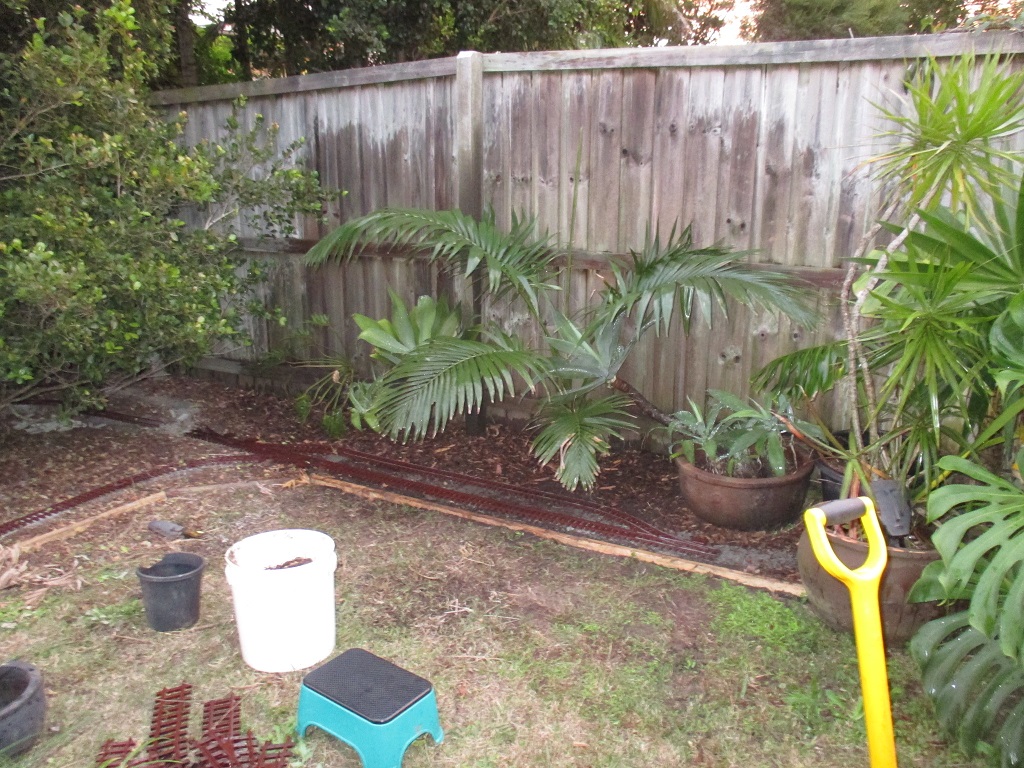
Some planting has begun at the North end of the extension.

The station will look great under the palm.
Just hope the palm will survive the transplant into here..

More planting to come...

24/08/16
A rather belated update shows a lot of work has been going on since the last post.
The palm I transplanted into the garden died within a month ("transplant shock" from what I could gather from Google), so I went to the Rosemount Nursery near Nambour and *may* have spent $200 on plants, Oops..

The track has been ballasted. After initially letting it set, I keep the track damp to encourage moss growth.
The bricks under the large fern is where the IP Eng. station will go.
As can be seen, the tree above the balloon loop drops an excessive amount of leaves year round. The area was completely cleared of leaves a week ago!
Need to get that track sweeper wagon built...

The handlaid sections of the mainline and mill loop have been made, installed and ballasted.
It's taking much longer to dry as it's always in the shade..

The North end of the extension has also been partially planted (will need to get some mini ferns later on)
The small palms at the front don't like the amount of sun they're getting, so I'll need to move them and replace with a larger palm like the one on the left.

found the polypropolene sleepers to be far too thick, and without a means of cutting them down accurately, I swapped them out for some "borrowed" lego pieces.
Here, the line has been screwed down and awaits ballast.
The handlaid sections are fastened to the plastic track via fishplates and strong glue. Sounds like it shouldn't work but it's worked for me before..


The initial application of ballast comprises of 3 parts gravel, 1 part sand and 2 parts cement.
This is packed under and around the track to support and hold it. The excess is brushed down between the sleepers.

This first "coat" is given a gentle but thorough soak, and allowed to dry for a few minutes

The topcoat of ballast (which will actually be seen) is made up of roughly:
3 parts cement
1 part cement dye (powder)
1 part sand
1 part coir peat (for moisture retention)
1 part scraped up moss from other areas to get the moss growth started.

This is then carefully applied so as not to get too much between the rails and foul where the wheel flanges will run. Then watered down with the "mist" setting on the hose nozzle.

A couple of the pot plants can be removed to facilitate easy access.

Additional touchups of the cement mixtue will be required here and there once this lot dries.
The track looks pretty muddy now but it dries up ok. A little extra dry topcoat applied when the existing coat is nearly dry should improve the texture..

The rock is holding down a slightly high spot in the track while the ballast sets.


1/09/16
The original track over the bridge was cut with the angle grinder and pulled out today, bringing half of the bridge structure with it..

..The rest was buried in-situ, due to the presence of redbacks hiding under the bridge. (which were sprayed anyway)

My el-cheapo materials and treatments were unsurprisingly inneffective. Whilst the bridge was still serviceable after 2 years, it would only have lasted 3 years at best. The pine broomstick stringers were in poorest condition, followed by the pretty much buried paperbark piles. I'd be comfortable using similar treatment and construction methods on the new bridge, considering we think we'll stay here only another 2-3 years.

Many a derailment happened here. Reverse curves, never again..

The last of the trackbed has been installed.
The old wagon siding (which sees little use) and the loco shed will become part of a live-steam-powered bush sawmill, with the Stainz 0-4-0WT being owned by the sawmill company.
The mill itself will be mounted on a board, and will be placed next to the siding (on the grass) during operating sessions. The area to be occupied by the mill may get paved to provide a decent footing..


The large fern at the other end was getting far too much sun and drying up very quickly, despite daily thorough watering.
I don't currently have the funds to get a bigger palm to shade it, so I improvised for the time being.


For the handlaid sections, I need sleepers. As nearly all of the
extension will have only rails visible, I'm chopping up some
polypropolene out of the scrap bin from my old work for sleepers - they
chuck out loads of new material! Best of all, they won't rot under the
ballast.
These will be spaced about 3-4" apart, but I'll still need to find some hardwood for the bridge sleepers..
Code 250 aluminium rails from Argyle Locomotive Works are also on their way.
These will be spaced about 3-4" apart, but I'll still need to find some hardwood for the bridge sleepers..
Code 250 aluminium rails from Argyle Locomotive Works are also on their way.

18/07/16
The edging timbers have been marked, cut and assembled in place, then soil filled in round them.
The bark mulch has also been put in. Surplus mulch is on the blue tarp, covered from the weather.

19/07/16
A laser-cut plywood station kit arrived from IP Engineering.
Some mods will be made, like a corrugated roof instead of the laser-scribed tiled effect. Interior lighting will also be a feature of all buildings from here on, with the older buildings to be retrofitted..
24/07/16
The first of the track has been screwed down.
Most of the balloon loop is now down, save for a 4ft long section which will be handlaid.
The aluminium rails have arrived from Argyle and await assembly onto some sleepers..

Packing and leveling the track with ballast will then follow.


27/07/16
Some planting has begun at the North end of the extension.

The station will look great under the palm.
Just hope the palm will survive the transplant into here..
More planting to come...

24/08/16
A rather belated update shows a lot of work has been going on since the last post.
The palm I transplanted into the garden died within a month ("transplant shock" from what I could gather from Google), so I went to the Rosemount Nursery near Nambour and *may* have spent $200 on plants, Oops..

The track has been ballasted. After initially letting it set, I keep the track damp to encourage moss growth.
The bricks under the large fern is where the IP Eng. station will go.
As can be seen, the tree above the balloon loop drops an excessive amount of leaves year round. The area was completely cleared of leaves a week ago!
Need to get that track sweeper wagon built...

The handlaid sections of the mainline and mill loop have been made, installed and ballasted.
It's taking much longer to dry as it's always in the shade..

The North end of the extension has also been partially planted (will need to get some mini ferns later on)
The small palms at the front don't like the amount of sun they're getting, so I'll need to move them and replace with a larger palm like the one on the left.

found the polypropolene sleepers to be far too thick, and without a means of cutting them down accurately, I swapped them out for some "borrowed" lego pieces.
Here, the line has been screwed down and awaits ballast.
The handlaid sections are fastened to the plastic track via fishplates and strong glue. Sounds like it shouldn't work but it's worked for me before..

Plastic track plonked down on the roadbed - some leveling required..

The initial application of ballast comprises of 3 parts gravel, 1 part sand and 2 parts cement.
This is packed under and around the track to support and hold it. The excess is brushed down between the sleepers.

This first "coat" is given a gentle but thorough soak, and allowed to dry for a few minutes

The topcoat of ballast (which will actually be seen) is made up of roughly:
3 parts cement
1 part cement dye (powder)
1 part sand
1 part coir peat (for moisture retention)
1 part scraped up moss from other areas to get the moss growth started.

This is then carefully applied so as not to get too much between the rails and foul where the wheel flanges will run. Then watered down with the "mist" setting on the hose nozzle.

A couple of the pot plants can be removed to facilitate easy access.

Additional touchups of the cement mixtue will be required here and there once this lot dries.
The track looks pretty muddy now but it dries up ok. A little extra dry topcoat applied when the existing coat is nearly dry should improve the texture..

The rock is holding down a slightly high spot in the track while the ballast sets.


31/08/16
The joining area of the original line has been pretty much demolished, even the sugarcane was ripped out. The old wagon siding was shortened back to it's former length.
The loco shed will remain where it is, but the watertank and coal pile will be moved.
The original Anzac Creek bridge will come out very shortly as well. The bridge may yet be incorporated into the new design. See how I go I guess..

1/09/16
The original track over the bridge was cut with the angle grinder and pulled out today, bringing half of the bridge structure with it..
..The rest was buried in-situ, due to the presence of redbacks hiding under the bridge. (which were sprayed anyway)

My el-cheapo materials and treatments were unsurprisingly inneffective. Whilst the bridge was still serviceable after 2 years, it would only have lasted 3 years at best. The pine broomstick stringers were in poorest condition, followed by the pretty much buried paperbark piles. I'd be comfortable using similar treatment and construction methods on the new bridge, considering we think we'll stay here only another 2-3 years.

Many a derailment happened here. Reverse curves, never again..

The old wagon siding (which sees little use) and the loco shed will become part of a live-steam-powered bush sawmill, with the Stainz 0-4-0WT being owned by the sawmill company.
The mill itself will be mounted on a board, and will be placed next to the siding (on the grass) during operating sessions. The area to be occupied by the mill may get paved to provide a decent footing..

The ashpit was filled in. It was a pain to remove the leaves, and it never really felt right having an
ashpit with a basic bush loco shed. Frankly, I doubt a small sawmilling company
would even bother with the luxury of an ashpit.

The bridge area and remaining creek up to the fence was filled in.
The rest of the old creek will be left as is, as it's matured nicely. I may yet however turn it into a farmer's dam..
The rest of the old creek will be left as is, as it's matured nicely. I may yet however turn it into a farmer's dam..

I don't currently have the funds to get a bigger palm to shade it, so I improvised for the time being.
The fern soon died too. I'm getting real good at killing plants.

03/09/16
The new station building is nearing completion.
This is an IP Engineering laser-cut plywood kit.
I've overlaid corrugated card on the roof instead of the scribed shingles, and the front awning's angle has been reversed - it originally tilted up.
Working lights are also being fitted, the outdoor ones being made from old plastic wheels.

16/03/17
It's been a very long time since the last update.
The extension work was mothballed for a few months while I decided what I wanted to do with the Anzac Creek Tramway in the long term.
But a lot of other work has been done, including the construction of an indoor 45mm layout, to use during the hotter months and to make testing locos/stock much easier. New buildings are progressing, new rollingstock, modifications and repairs to the locos etc etc. so the works have kept busy.

The
line is in a bad state; Isolated sections of rotting track, dead and
overgrowing plants everywhere. The navvies have a lot of work ahead of
them.


The
trackbed into the new 2 road loco shed is just about done. Will need
some more cement for ballast, and fabricate a couple panels of track..

28/04/17
The station passing loop has been pulled up and relaid, owing to the track expanding in the sun and bowing upward, causing the ballast around it to cave in under the track. consequently, when the track cools down in the afternoon, it doesn't settle back down properly.
More screws and a better ballast mixture were used this time. for the time being, this section has been covered over to keep the sun off it until I can get a permanent shade solution in place..

After the last round of shade-bearing plants failed, I transplanted a pair of Montery Pines in. The bigger one didn't survive, though the smaller one is the first plant I'm having some degree of long-term success.
This spot is proving a very difficult one to plant. Too much sun..

The line into the rainforest of pot plants however is doing pretty well overall. Some mossy undergowth has been planted in the shade, and the plastic pots covered up with bamboo screen. The ballast mix I used here has disintergrated in places and will be redone.

To provide some more shade for the struggling plants at the north end of the "rainforest", some aluminium tube was sprayed a rusty color and zip-tied together to make a makeshift climbing frame for the jasmine vines to take hold of..

The first handlaid section of the extension was made, I'd forgotten just how time-consuming hand-spiking the rails is! Can't say I mind, though.

After deburring the cut rails in the orignal track, new joiners were slipped on in readiness for the old bridge track (now modified for it's new purpose).
A piece of the old bridge is left roughly in-situ on the edge of the old roadbed as a reminder of what once was...

02/05/17
The components for the new bridge over the new Anzac Creek had been waiting for weeks to be installed. Yesterday evening I finally got round to it.
The creek's pump system was also flushed, cleaned and tested.

The parts have been colored with the rusty vinegar method, glued with outdoor pva and sealed with a few liberal coatings of outdoor wood sealer.
The last bridge was simply sprayed with grey primer, painted to look sorta like old timber with acrylic, decking oiled, and superglued! That lasted 2.5 years so this one should outlive that, surely..


The sugar mill loco shed has been all but finished for a long while but only now getting it's update. It just needs the ridge capping (bottom left, ready to go) fitted.
Shown here where it will normally live on the indoor layout.


X4 AA rechargeables supply the four 6V leds in the lamps (again modified old wheels).
I didn't bother putting a switch in the circut, I just remove one battery to turn it off.
In hindsight, 6V running from X4 AAs is pretty overkill, and a toggle button switch was later added. At some point, I might swap out the 6V LEDs for 3-volters..


I bought these benches on a Farcebook group 11 months ago. Only now getting them assembled!
They're laser-cut ply with acrylic ends.

08/05/17
I've been going nuts with the buildings lately.
The big (still unnamed) station has finally had it's gutter, rainwater tank and pipework fitted, the bench seats from the previous picture have been painted, the ramp's sides are done.
An ex-fish tank decoration was given to me by my little sister, who had no use for it.
The plant was duly hacked and drilled out (so much hot-melt glue holding it in) and I was left with a nice resin pot. Some paint and a new plant in the pot will bring it up to scratch..

I got round to fitting the ridge cap for the mill loco shed, but forgot the rubber cement I was using tends to melt thin plastic. Shit.
I can't remove the ridge capping without destroying the rest of the roof (glue's that strong) so I'll have to think of something else..

09/05/17
The former bridge track has had it's check rails removed and the curve changed a bit to fit it's new use in much the same locoation. A fairly substantial embankment was required to get the track across what is left of the old creek gully..


A solution was found for the shading problem at the South end of the rainforest. Another aluminium climbing frame for the rampant vines of the rainforest to spread to.
For the time being, some spare bamboo screening (well, remains of it) are providing the shade until the vines take over.

Spare snake mesh was used between the tubes and wired on. Hopefully it won't take the vines too long to cover up this eyesore..
The ailing pine will most likely come out.


My crude but effective enough "foundry".
Needless to say, it was all set up so that the fumes would be blown away by a fan, of which I was upwind. Worked quite well actually.
Yes, the crucible is a little baked bean can with a spout bent into it.
I made two plaster molds and with careful removal of the cooled castings, they were able to be used about 3 times each before I had enough levers.

Results of the first test pour. Not too bad; some cleanup, filler and paint will bring these up well.
The round bits are the counterweights for the levers, the levers themselves will be made from skewers and epoxied into holes drilled in the castings..
I needed 12 sets of castings, so I ended up doing 14 so I have spares in case I bugger some up.
The counterweights didn't turn out well enough to bother using, so I remelted them and cast them into bars of lead, which were then turned on the lathe, to make consistent counterweights. The lead "swarf" was easily distinguishable from the rest, so it was picked out of the swarf tray and remelted again, and cast with the remainder of the spare lead, into Lego-sized blocks, for rollingstock weights.
Did I mention my hatred of waste?

05/06/17
A new building, utilising some new techniques and materials in the hopes I can leave this one outdoors permanently..

07/06/17
No prizes for guessing what it is now.
I've used 0.3mm aluminium roof flashing, ran through a paper crimper. At last - cheap, quick, weatherproof and easy corrugated iron!
The stump caps are foil baking tray, as the flashing is too thick to use for this.

12/06/17
Some of my recent work is a little shithouse though..
The coffee sticks poking out the bottom will anchor the building to the ground.


In the meantime, the entire balloon loop was pulled up.
I used far to much cement in the ballast so it was very brittle and crumbly, and to my eye looked like dried mud. It was just easier to start over.

The track was cleaned up and the sleeper tops painted with an aged wood colour. Although I will try to hide the sleepers in the ballast, some bits will inevitably show through. Having them the right color disguisies the plastic nicely.
More pavers were also put into the roadbed, as the track was bowing up in places between where it was already screwed down.

20/06/17
The goods shed is almost there. The door is made of coffee & popsicle sticks with a leftover whitemetal handle from another project.
The windows are cast resin by my mate John. Thanks again mate.
This building is also lighted but it's pretty dim so it may not be noticable during evening runs.

The track around the mill is going back in, better secured and with better ballast.
The track layout has been modified slightly to provide more clearance on the unloading line where it passes the loco shed.

Mozzie repellant and a cironella oil-burning lamp is the order of the day.

The vines are slowly taking hold.

The North end is occasionally getting attention. Connecting the original line to the extension is about 15 inches away. I'd always known I'd need to handlay some track for the extension. The points are Newqida, with a fancy paintjob, modified joining sockets and a centre-over spring to hold the blades in place. Annoyingly, for the spring to do it's job, it's too strong to allow the points to be trailed, so they must be thrown after a train passes over it. Otherwise your train'll derail when it comes back around. The sawmill yard's looking fuckin' A. Some areas will need patch reballasting though.

I've been using a free layout planning software called "SCARM" to plan the sugar mill buildings. More to come yet.

10/07/17
The track relaying is slowly progressing, with preparations being made for pouring a concrete floor for the loco shed.
The PVC downpipe offcuts were pinched from a skip at a house construction site one evening. Joined together, they'll be useful for the sugar mill chimney..


The new station is all but complete. Just need to finish painting the people.
The platform is surfaced with sand glued down with waterproof pva which has lent it a nice darkened appearance.
I didn't bother putting a switch in the circut, I just remove one battery to turn it off.
In hindsight, 6V running from X4 AAs is pretty overkill, and a toggle button switch was later added. At some point, I might swap out the 6V LEDs for 3-volters..

A
few months back, the big station had a platform built, and is almost
done.. A rainwater tank to go on the platform is also nearly done.

I bought these benches on a Farcebook group 11 months ago. Only now getting them assembled!
They're laser-cut ply with acrylic ends.

08/05/17
I've been going nuts with the buildings lately.
The big (still unnamed) station has finally had it's gutter, rainwater tank and pipework fitted, the bench seats from the previous picture have been painted, the ramp's sides are done.
An ex-fish tank decoration was given to me by my little sister, who had no use for it.
The plant was duly hacked and drilled out (so much hot-melt glue holding it in) and I was left with a nice resin pot. Some paint and a new plant in the pot will bring it up to scratch..

I got round to fitting the ridge cap for the mill loco shed, but forgot the rubber cement I was using tends to melt thin plastic. Shit.
I can't remove the ridge capping without destroying the rest of the roof (glue's that strong) so I'll have to think of something else..

09/05/17
The former bridge track has had it's check rails removed and the curve changed a bit to fit it's new use in much the same locoation. A fairly substantial embankment was required to get the track across what is left of the old creek gully..


A solution was found for the shading problem at the South end of the rainforest. Another aluminium climbing frame for the rampant vines of the rainforest to spread to.
For the time being, some spare bamboo screening (well, remains of it) are providing the shade until the vines take over.

Spare snake mesh was used between the tubes and wired on. Hopefully it won't take the vines too long to cover up this eyesore..
The ailing pine will most likely come out.

11/05/17
I needed more point levers for the extension, but as my Tenmille point levers don't have enough travel to throw the Newqida points, I've fitted centre-over springs to throw them by hand.
But I still need the point lever detail. So I decided to cast dummy levers in lead, using the Tenmille ones as patterns. This mold is plaster with some cement mixed in for strength. To prevent the molten lead from popping and bubbling when poured into the molds, they were dried in the oven for an hour prior to use.

My crude but effective enough "foundry".
Needless to say, it was all set up so that the fumes would be blown away by a fan, of which I was upwind. Worked quite well actually.
Yes, the crucible is a little baked bean can with a spout bent into it.
I made two plaster molds and with careful removal of the cooled castings, they were able to be used about 3 times each before I had enough levers.

Results of the first test pour. Not too bad; some cleanup, filler and paint will bring these up well.
The round bits are the counterweights for the levers, the levers themselves will be made from skewers and epoxied into holes drilled in the castings..
I needed 12 sets of castings, so I ended up doing 14 so I have spares in case I bugger some up.
The counterweights didn't turn out well enough to bother using, so I remelted them and cast them into bars of lead, which were then turned on the lathe, to make consistent counterweights. The lead "swarf" was easily distinguishable from the rest, so it was picked out of the swarf tray and remelted again, and cast with the remainder of the spare lead, into Lego-sized blocks, for rollingstock weights.
Did I mention my hatred of waste?

05/06/17
A new building, utilising some new techniques and materials in the hopes I can leave this one outdoors permanently..

07/06/17
No prizes for guessing what it is now.
I've used 0.3mm aluminium roof flashing, ran through a paper crimper. At last - cheap, quick, weatherproof and easy corrugated iron!
The stump caps are foil baking tray, as the flashing is too thick to use for this.

12/06/17
Some of my recent work is a little shithouse though..
The coffee sticks poking out the bottom will anchor the building to the ground.

After letting the dead pine dry out, I removed the branches and will pull it out later.

In the meantime, the entire balloon loop was pulled up.
I used far to much cement in the ballast so it was very brittle and crumbly, and to my eye looked like dried mud. It was just easier to start over.

The track was cleaned up and the sleeper tops painted with an aged wood colour. Although I will try to hide the sleepers in the ballast, some bits will inevitably show through. Having them the right color disguisies the plastic nicely.
More pavers were also put into the roadbed, as the track was bowing up in places between where it was already screwed down.

20/06/17
The goods shed is almost there. The door is made of coffee & popsicle sticks with a leftover whitemetal handle from another project.
The windows are cast resin by my mate John. Thanks again mate.
This building is also lighted but it's pretty dim so it may not be noticable during evening runs.

The track around the mill is going back in, better secured and with better ballast.
The track layout has been modified slightly to provide more clearance on the unloading line where it passes the loco shed.

Mozzie repellant and a cironella oil-burning lamp is the order of the day.

The vines are slowly taking hold.

The North end is occasionally getting attention. Connecting the original line to the extension is about 15 inches away. I'd always known I'd need to handlay some track for the extension. The points are Newqida, with a fancy paintjob, modified joining sockets and a centre-over spring to hold the blades in place. Annoyingly, for the spring to do it's job, it's too strong to allow the points to be trailed, so they must be thrown after a train passes over it. Otherwise your train'll derail when it comes back around. The sawmill yard's looking fuckin' A. Some areas will need patch reballasting though.

I've been using a free layout planning software called "SCARM" to plan the sugar mill buildings. More to come yet.

10/07/17
The track relaying is slowly progressing, with preparations being made for pouring a concrete floor for the loco shed.
The PVC downpipe offcuts were pinched from a skip at a house construction site one evening. Joined together, they'll be useful for the sugar mill chimney..

The
original tramway is now a big balloon loop! Some minor reballasting in
places will see the original track ready for a test run..

The new station is all but complete. Just need to finish painting the people.
The platform is surfaced with sand glued down with waterproof pva which has lent it a nice darkened appearance.

Very pleased with the potted palm. The "fronds" are feathers; bent, painted and trimmed to size.

Kinda reminds me of Kuranda station, up in North QLD.

The point lever bases have been cleaned up awaiting some filler. The plastic original is at bottom.

19/07/17
Sorely needed extensions to the building storage shelves have been added, almost doubling the storage capacity. Still cost me $50 though.

20/07/17
I've been getting started on part of the sugar mill. This will live outside permanently.

30/07/17
The 4" pvc downpipe scraps had the larger flanged sections cut off and a large tin cut up to align the bits of tube while the glue dried.

31/07/17
Finally all the track is down!
It's taken me far too long. I still can't test it yet, more ballasting and packing needed here and there..

The shuttering for the mill loco shed's floor has been made.

The railheads were cleaned and the flangeways carved two hours later as the cement began to set.

The mill chimney is progressing, with the sections glued together and the gaps filled awaiting sanding smooth.
It's about 30" tall.
I'm loosely basing this on the final chimney of Moreton Mill in Nambour.

The railing is the aforementioned snake-wire, with half the squares cut out.
Won't be attaching the platform to the chimney until the filler on the tube has been sanded..

01/08/17
The filler has been sanded reasonably smooth, the spiral strip added and top platform attached.

The cast point lever bases have finally had their filler applied and filed back. A little rough but they should do..

The shed floor's curing.

08/08/17
With the tracklaying widing up I thought I'd better start testing and fettling the track with the Krauss. I may need a snow plough to get through the cutting near the cat run..

The local preschool put this out at the roadside last week so we grabbed it. I'll pull it apart and fix it up. Will be good to have on running days.

22/08/17
The mill chimney is almost done. I ran out of satin black pant and had to finish it in gloss. Will keep an eye out for some satin clear paint..

25/08/17
When I trimmed the trees in the backyard a few months ago, I kept a few of the bigger branches to cut up for logs and tree stumps.
The stumps were cut by hand and a 2mm hole drilled in the bottom on the drill press. Dad kindly let me use some unwanted galvanised bike spokes to cut up and use as locating pins.

Combined with some mossy undergrowth, they seem to do the job.

29/08/17
About a year ago, I noticed Mum's jade plant looks pretty tree-like. Since then, I've been watering and fertilising it so it'll grow big enough to cut some off and plant in the garden. These two branches were the result.

Doesn't seem to matter how many expansion joints and fasteners or shade I provide, this plastic shit just keeps fucking with me in the sun.

03/09/17
Constructing the dummy point levers is done, now to paint.
Constructing the dummy point levers is done, now to paint.

04/09/17
The
main mill building's cladding is all on, spray painted and window holes cut out with a
dremel. Window frames have since been fitted but will be shown once further
work like doors, gutters(?) are added..

08/09/17
Figures in various states of painting.

10/09/17
The tree above the Southern end of the line was thinned out a bit to try and redue the excessive amount of leaves dropped on the line year round.

15/09/17
The track around the mill is fixed, and ballast touched up where needed. Sand was placed to make a foundation for the sugar mill and laced with borax to (hopefully) prevent weeds.

I added lots of millet broom bits to the ballast mixture to simulate spilt sugar cane around the mill.

The cane unloading shed under construction.
Erroneously, I cut the legs long enough for my tallest loco to pass through it. The only locos suposed to go through are little shunters unloading the cane trucks (Malcolm Moore etc.)
I've flame-treated the surplus length of the legs (helps preserve the wood) and will just sink them into the ground until the shed is the right height.

27/09/17
The main mill buildings have progressed well, with windows and gutters fitted. The doors have been made and the walls cut out to accept them, but I've yet to finish painting the door's frames before fitting them.

A little "extension" has been made to accomodate the batteries and switch for the mill's lighting. The roof just lifts off for ease of access and the compartment is fully sealed to keep bugs from making nests in there.

02/10/17
With Spring coming in, the trees all think it's Autumn, and they're dropping a shitload of leaves.
Even with this however, the selective trimming of the branches over the track has greatly reduced the amount of leaves falling on it.

The warmer weather is already causing problems. Even with thorough watering every other day, some fully shaded plants are doing poorly.

More seriously, and fucking annoyingly, is some of the handlaid track is bowing up very badly.
Staggered expansion joints were cut, and more lego support erm, thingies were fitted.

A 'proper' handlaid section near the sawmill site was also bowing (thanks to the adjacent plastic points), so it too was given staggered expansion joints. With the sleepers properly spaced however, it wasn't necessary to provide additional support.

The point levers were painted weeks ago, but only now have I weathered them with real rust.
I way-the-fuck overdid it here. Fortunately, the excess rust is easily removed with a brass wire brush.

09/10/17
Cane unloading shed getting there

15/10/17
Downpipes added and everything painted, external lighting and connections for such completed.

16/10/17
Half the mill installed. The unloading roof has a light in it, which plugs into the front of the main mill building.
The mill is supported by a few stones under the front wall, further building up of the ground under/around the mill is to be done..

It seems I managed to make the other building 6 inches too long. Fuck. Out with the hacksaw for the initial cut.
Apologies for the quality of this image, my camera's resolution options are either too small, or way bigger than is necessary. I use the larger option and resize each photo. I resized this one twice by mistake.

The remaining dummy point levers were installed.

I drilled and glued some more galvanised bike spokes underneath to keep them where I want 'em.
I then realised I'd somehow made 5 more of these than I needed. Fuck I'm good with numbers..

18/10/17
Originally I wanted to make a cast iron water tank for the mill loco shed but I couldn't find anything suitable to modify.
Sure I could've easily scratched the thing from styrene sheet, but relatively, that would've cost a fortune.
So I looked into making a standpipe and found a great way to make one cheaply from irrigation pipe and fittings.
Credit to Greg Hunter and his Sandstone and Termite railway down in Sydney.

While getting the irrigation bits I bought a couple more baby ferns to help fill in the gaps around the creek.

23/10/17
After trying to make a complex mold to cast the chimney base in concrete, I realised "just carve it from a block of Hebel you fuckwit!"
A 100x200x600 block from Bunnings set me back all of $5, and I've still got half of it left. Carving bricks and painting are yet to be done.
The little aluminium angle frame is for the burner/smoker unit.

The
brick supporting the track at the North end of Anzac Creek has finally
been covered by a dummy retaining wall. A long needed addition.

As the old sugarcane had to be ripped out (just makes it easier) I had to get another piece of cane and plant it. A few weeks later..

We've had a few really wet weeks lately, and it's compacted the ballast pretty well in places, so some reballasting was done on the Northern section.

The more exposed Southern section has taken a beating but aside from the need for some reballasting, seems to have stood up well.

29/10/17
I've been experimenting with smoke generation for the mill. Here, I'm using a meths burner heating a silver soldered brass reservoir filled with cooking glycerine. Smells faintly sickly-sweet, and quite safe to breathe.
While it looks fantastic, it's not suitable for anything more than taking a few pictures. After 20 minutes, the glycerine reaches it's flash point and ignites, shooting flames up the PVC chimney. That's why the chimney is shorter now, the bottom section was damaged the other day when this first happened.
I've tried restricting the burner, but as the burner heats up, it burns more and more feircely, cancelling out the restriction.

03/11/17
The standpipe is about done, just needs a piece of foam glued in the bottom and a bit of coathanger wire to locate the whole thing in the ballast.
The 'bag' is heatshrink, shrunk onto a steel rod the same diameter as the pipe spout, then removed, and glued onto the spout.

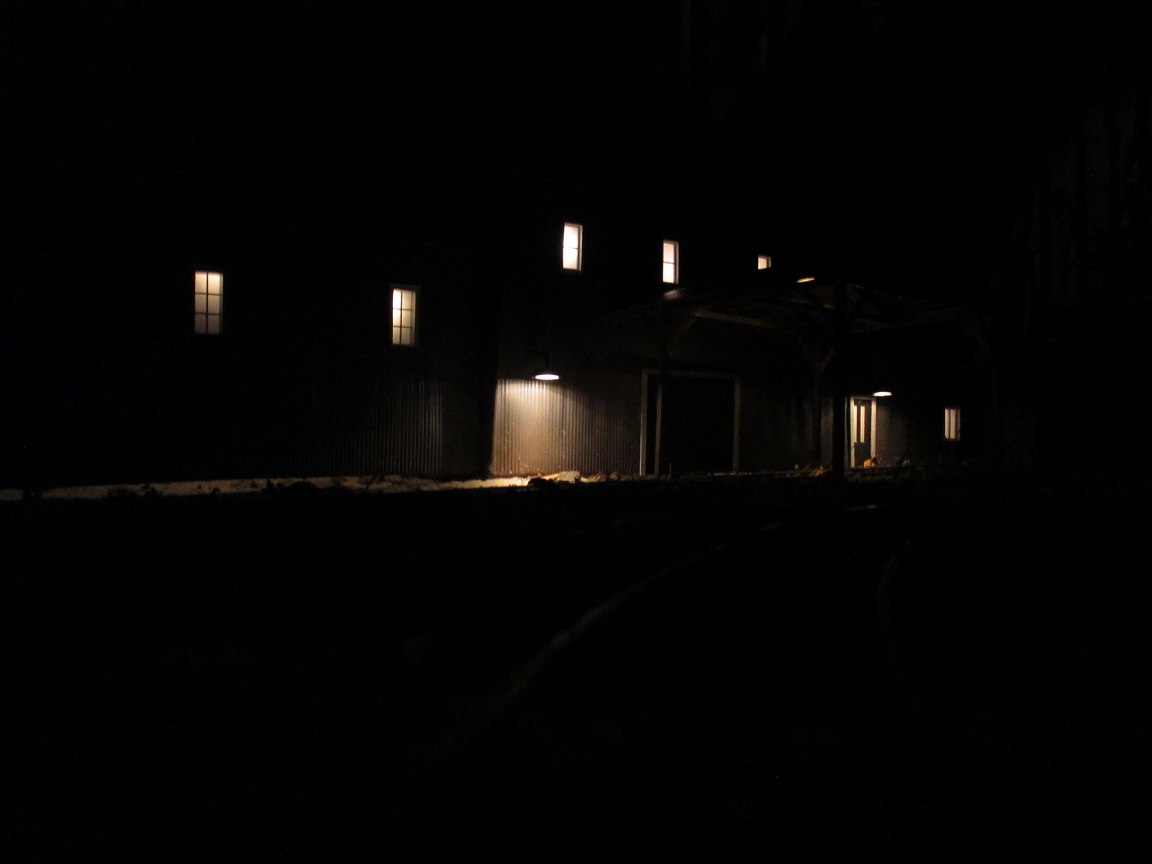
fter final sealing and tweaking the internal lights, the boiler/engine room (as I'm now calling it) is installed.

Lighting looks about right in the flesh. My camera isn't much good at dark photography. To get a shot this good required 10 minuted of fucking with every setting on the camera.

Standpipe installed in front of the mill shed.
The spout is moveable. I may yet give this thing some rusty weathering, but I'll see how it looks after a few months in the sun first.

04/11/16
I've marked out where to carve the stone block effect on the hebel chimney base, in pencil. Frequent resharpening of the pencil ensured accuracy.

It's actually a 3x25mm peice of alumium bar, with popsicle sticks glued
over it, followed by sections of plastic rail weathered with the iron
powder. The whole lot was then sealed and installed.

As the old sugarcane had to be ripped out (just makes it easier) I had to get another piece of cane and plant it. A few weeks later..

We've had a few really wet weeks lately, and it's compacted the ballast pretty well in places, so some reballasting was done on the Northern section.

The more exposed Southern section has taken a beating but aside from the need for some reballasting, seems to have stood up well.

29/10/17
I've been experimenting with smoke generation for the mill. Here, I'm using a meths burner heating a silver soldered brass reservoir filled with cooking glycerine. Smells faintly sickly-sweet, and quite safe to breathe.
While it looks fantastic, it's not suitable for anything more than taking a few pictures. After 20 minutes, the glycerine reaches it's flash point and ignites, shooting flames up the PVC chimney. That's why the chimney is shorter now, the bottom section was damaged the other day when this first happened.
I've tried restricting the burner, but as the burner heats up, it burns more and more feircely, cancelling out the restriction.

03/11/17
The standpipe is about done, just needs a piece of foam glued in the bottom and a bit of coathanger wire to locate the whole thing in the ballast.
The 'bag' is heatshrink, shrunk onto a steel rod the same diameter as the pipe spout, then removed, and glued onto the spout.

fter final sealing and tweaking the internal lights, the boiler/engine room (as I'm now calling it) is installed.

Lighting looks about right in the flesh. My camera isn't much good at dark photography. To get a shot this good required 10 minuted of fucking with every setting on the camera.
Standpipe installed in front of the mill shed.
The spout is moveable. I may yet give this thing some rusty weathering, but I'll see how it looks after a few months in the sun first.

04/11/16
I've marked out where to carve the stone block effect on the hebel chimney base, in pencil. Frequent resharpening of the pencil ensured accuracy.

05/11/17
Block effect done, and the damaged bottom section of the chimney replaced, now for finishing..

Block effect done, and the damaged bottom section of the chimney replaced, now for finishing..

The mill yard and balloon loop were reballasted and a damaged piece of track replaced.
The colored thing is a rerailing ramp I've made but not yet painted. Seems to work quite well.

I had a load of bigger rocks sifted from the new ballast and needed somewhere to put them. So I stopped putting it off and repotted this palm which was falling over following the big storms a few weeks back, and dumped the rocks on top

06/11/17
Finally, after a few more tweaks and repairs to the track, a train runs the length the Anzac Creek line for the first time in almost 18 months.
I've yet to test all the current locos and rollingstock to check for problems, but the more tolerant bogey wagons are behaving themselves which is a start.
The long-wheelbase 4-wheelers, not so much. (Pretty sure they just need more weight in 'em)

The farm house and shed had to come out, as the cat run is being pulled down so the 1:1 scale house can be repainted.

13/11/17
The chimney base has been given several coats of my weathered timber wash as an experiment, and I'm pretty happy with it. A light grey wash was carefully applied between the blocks to represent mortar. Some dark downward streaks for weathering and sealing the whole thing are yet to be done.

I got this Australian-made smoke generator for $58 posted on ebay. The guy makes these in 6 and 12 volts. I got the 12V version as I find 12V power adapters easier to find.
Runs on light oil. Baby oil, Singer, 3-in-1 etc. The instructions warn against the use of water-based fluids. I can't imagine why, to be honest..
Draws about 2.5A.

Mum found some old photos from when we moved in 10 years ago. Our unit was brand new, we've been it's only inhabitants.

"Holy fuck" was my reaction to how "my" garden looked a decade ago. I was almost 12 at the time.

27/11/17
Took me some time to get around to it, but I've made up the wiring for the smoke unit. A 12V 3A power supply, erm, supplies the power.
This is running on 3-in1 oil which seems to work much better than baby oil. That said, my desk lamp makes the smoke so much more visible than it is outside.
The chimney repair is thankfully nearly finished. It's even needed a full repaint. (God knows why, it's been weeks - I can't remember) The base has also been weathered and sealed.

28/11/17
The smoke unit itself along with the power supply will be taken inside after the conclusion of a running session. The power feed however will be left in place year round.
The plugs were carefully sealed where the wires are attached. It's then run under the track in a length of garden hose to protect it.
The hose comes up inside the cavity in the chimney base, so the smoke unit can be plugged in.
The power supply plugs in at the other end.

While the entire power setup does work quite well, the smoke output is predictably dismal and barely visible with no wind. Further experimentation with various oils and adjustment of the wicks in the unit are needed..

If this is the best I can do, I'm better off selling the smoke unit and not bothering at all..

After a lot of fuckarsing about with the track, the 'Moore and the Krauss now run around the entire tramway without problems. I've not yet tested all the wagons but some are better runners than others.
The bogey flat wagon needs more weight, and the 4-wheeled flat & open wagons are terrible on the 2ft curves. Their wheelbases are too long. Either I work out some way to let the wheelsets swivel, fit bogeys to the wagons, or sell them off..
The coaches & guard's van are being repaired/modified at the moment, and Baron is yet to run anywhere on the line..

Getting sick of the leaves around the mill. Will need to get a tarp and cut it to size, to cover the area..
Some weeds have appeared here and there around the mill, where I've no used enough borax. So the area has been thoroughly salted which will hopefully reduce future maintenance.

14/12/17
I pulled the smoke machine apart, and found hardly any of the wick was touching the heating element. After fettling the wick I looked into flash points of various oils people use in smoke generators.
I went for citronella lamp oil which I have on hand. Though the thing smokes much better now, I'm still not sure it's worth the trouble.

The photo makes it look better than it is. And that's when the wind goes away for a few seconds.

21/12/17
The loco shed still needed ballasting with ash, and the coal pile added.
The area to the left also needed building up with a dry mix of gravel and sand.

Although the crushed up coal ash was mixed with sand and cement, I decided to reinforce it with a similar glue mix to what I use in HO scale - water, a little detergent and PVA glue (outdoor grade in this case).
The coal pile was placed, and loose coal used to blend it with the surrounds.
The lot was then wetted down with the hose on "mist" setting and thoroughly sprayed with glue mix.

Around this time, it started getting hot again, so I prepared to retreat inside for 7 months. The weeds love this humid tropical weather..

04/04/18
By February, the remains of the cat run were dismantled when we heard the owners of the unit want to sell it, so of course things needed to be tidied up for all the open houses and short-notice inspections we'd soon be putting up with. Now, the rent's been going up year after year, and with more and more things with the house going wrong after only a decade, we've been playing with the idea of moving out. Hopefully an owner-occupier buys it, so we don't have to wait till out lease runs out in October..

The colored thing is a rerailing ramp I've made but not yet painted. Seems to work quite well.

I had a load of bigger rocks sifted from the new ballast and needed somewhere to put them. So I stopped putting it off and repotted this palm which was falling over following the big storms a few weeks back, and dumped the rocks on top

06/11/17
Finally, after a few more tweaks and repairs to the track, a train runs the length the Anzac Creek line for the first time in almost 18 months.
I've yet to test all the current locos and rollingstock to check for problems, but the more tolerant bogey wagons are behaving themselves which is a start.
The long-wheelbase 4-wheelers, not so much. (Pretty sure they just need more weight in 'em)

The farm house and shed had to come out, as the cat run is being pulled down so the 1:1 scale house can be repainted.

13/11/17
The chimney base has been given several coats of my weathered timber wash as an experiment, and I'm pretty happy with it. A light grey wash was carefully applied between the blocks to represent mortar. Some dark downward streaks for weathering and sealing the whole thing are yet to be done.

I got this Australian-made smoke generator for $58 posted on ebay. The guy makes these in 6 and 12 volts. I got the 12V version as I find 12V power adapters easier to find.
Runs on light oil. Baby oil, Singer, 3-in-1 etc. The instructions warn against the use of water-based fluids. I can't imagine why, to be honest..
Draws about 2.5A.

Mum found some old photos from when we moved in 10 years ago. Our unit was brand new, we've been it's only inhabitants.

"Holy fuck" was my reaction to how "my" garden looked a decade ago. I was almost 12 at the time.

27/11/17
Took me some time to get around to it, but I've made up the wiring for the smoke unit. A 12V 3A power supply, erm, supplies the power.
This is running on 3-in1 oil which seems to work much better than baby oil. That said, my desk lamp makes the smoke so much more visible than it is outside.
The chimney repair is thankfully nearly finished. It's even needed a full repaint. (God knows why, it's been weeks - I can't remember) The base has also been weathered and sealed.

28/11/17
The smoke unit itself along with the power supply will be taken inside after the conclusion of a running session. The power feed however will be left in place year round.
The plugs were carefully sealed where the wires are attached. It's then run under the track in a length of garden hose to protect it.
The hose comes up inside the cavity in the chimney base, so the smoke unit can be plugged in.
The power supply plugs in at the other end.

While the entire power setup does work quite well, the smoke output is predictably dismal and barely visible with no wind. Further experimentation with various oils and adjustment of the wicks in the unit are needed..

If this is the best I can do, I'm better off selling the smoke unit and not bothering at all..

After a lot of fuckarsing about with the track, the 'Moore and the Krauss now run around the entire tramway without problems. I've not yet tested all the wagons but some are better runners than others.
The bogey flat wagon needs more weight, and the 4-wheeled flat & open wagons are terrible on the 2ft curves. Their wheelbases are too long. Either I work out some way to let the wheelsets swivel, fit bogeys to the wagons, or sell them off..
The coaches & guard's van are being repaired/modified at the moment, and Baron is yet to run anywhere on the line..
Getting sick of the leaves around the mill. Will need to get a tarp and cut it to size, to cover the area..
Some weeds have appeared here and there around the mill, where I've no used enough borax. So the area has been thoroughly salted which will hopefully reduce future maintenance.

14/12/17
I pulled the smoke machine apart, and found hardly any of the wick was touching the heating element. After fettling the wick I looked into flash points of various oils people use in smoke generators.
I went for citronella lamp oil which I have on hand. Though the thing smokes much better now, I'm still not sure it's worth the trouble.

The photo makes it look better than it is. And that's when the wind goes away for a few seconds.

21/12/17
The loco shed still needed ballasting with ash, and the coal pile added.
The area to the left also needed building up with a dry mix of gravel and sand.

Although the crushed up coal ash was mixed with sand and cement, I decided to reinforce it with a similar glue mix to what I use in HO scale - water, a little detergent and PVA glue (outdoor grade in this case).
The coal pile was placed, and loose coal used to blend it with the surrounds.
The lot was then wetted down with the hose on "mist" setting and thoroughly sprayed with glue mix.

Around this time, it started getting hot again, so I prepared to retreat inside for 7 months. The weeds love this humid tropical weather..

04/04/18
By February, the remains of the cat run were dismantled when we heard the owners of the unit want to sell it, so of course things needed to be tidied up for all the open houses and short-notice inspections we'd soon be putting up with. Now, the rent's been going up year after year, and with more and more things with the house going wrong after only a decade, we've been playing with the idea of moving out. Hopefully an owner-occupier buys it, so we don't have to wait till out lease runs out in October..

Personally, despite all the work I've put into the tramway and it's
incomplete extension (that's never seen anything more than 3-4
test/navvies trains, and no steam at that), I'm very keen on moving on.
In the tramway's 3½ year existence, it's been used maybe a dozen times, if that.
There's several reasons for that:
1. Because the backyard is tiny, the track has had to be shoehorned into wherever it'll fit, (particularly the extension) which makes most of it very inaccessible for removing leaves, sticks, stones etc. from the track prior to a run. It takes about 2 irritating hours just to sweep the track. Then there's trimming the plants, etc. etc.
2. All the points are garbage, frankly. My early handlaid efforts are known to be unreliable at best, and I'm finding the Newqida points to be unsuitable for full outdoor exposure. They don't throw properly anymore, and the heat distortion plays too many games with the surrounding track.
The Newqidas would be ok in a garden under a patio, at most. Having only spent $140 on plastic, I've no regrets.
3. Most of the sleepers are rotting badly, with some sleepers being held together by moss alone. Virtually the whole original layout will need pulling up and re-sleepering in the next year, or two at most. This doesn't surprise me considering it's all secondhand timber of unknown types - and it's an inevitability with wooden sleepers anyway.
4. The heat and humidity here on the Sunshine Coast, especially this close to the beach, is a huge disincentive to going outside. This effectively rules out 7 months of the year for me, because I sweat excessively. The heat usually isn't so bad, it's the humidity.
5. My Roundhouse Fowler "Victoria" (in the final stages of construction at the time of writing) will look terrible negotiating the 2' radius curves I've had to use to fit the track in the yard. Yes, that's something I should've considered before I started building it, I'll own that cock up. Additionally, I'd have to take two large notches from the bottom fence rail, just to provide the clearance on the extension for her.
In short, it's easier for me to pack a loco, train and steaming kit in a wheely bag, take a 5-hour round trip down to the AMRA QLD elevated track in North Brisbane and run there, than it is to run at home; I go down there once every month or two. A lot of things need to change about the Anzac Creek line, and none those changes could ever happen in this backyard. That's simply the way it is.
01/05/18
The unit has sold, to a family keen to move in as soon as possible. Over the coming month or two, the entire line will be ripped up, and the salvageable stuff thoroughly cleaned and packed away. The roadbed will be left behind under new mulch. Only a few plants will come to the new garden..

Among the huge number of things learned, one thing that stands out is never to use sword ferns again. Just too damn invasive. Seriously, it's nuts.
All rail joints around the original line, even the new ones where the extension joins on, had to be heated before they'd let go.

About 90% of the sleepers need replacement. The other 10% is nearly as good as the day they went in!

I don't need to tell anyone this, but be careful with a blowtorch in the garden, will ya?

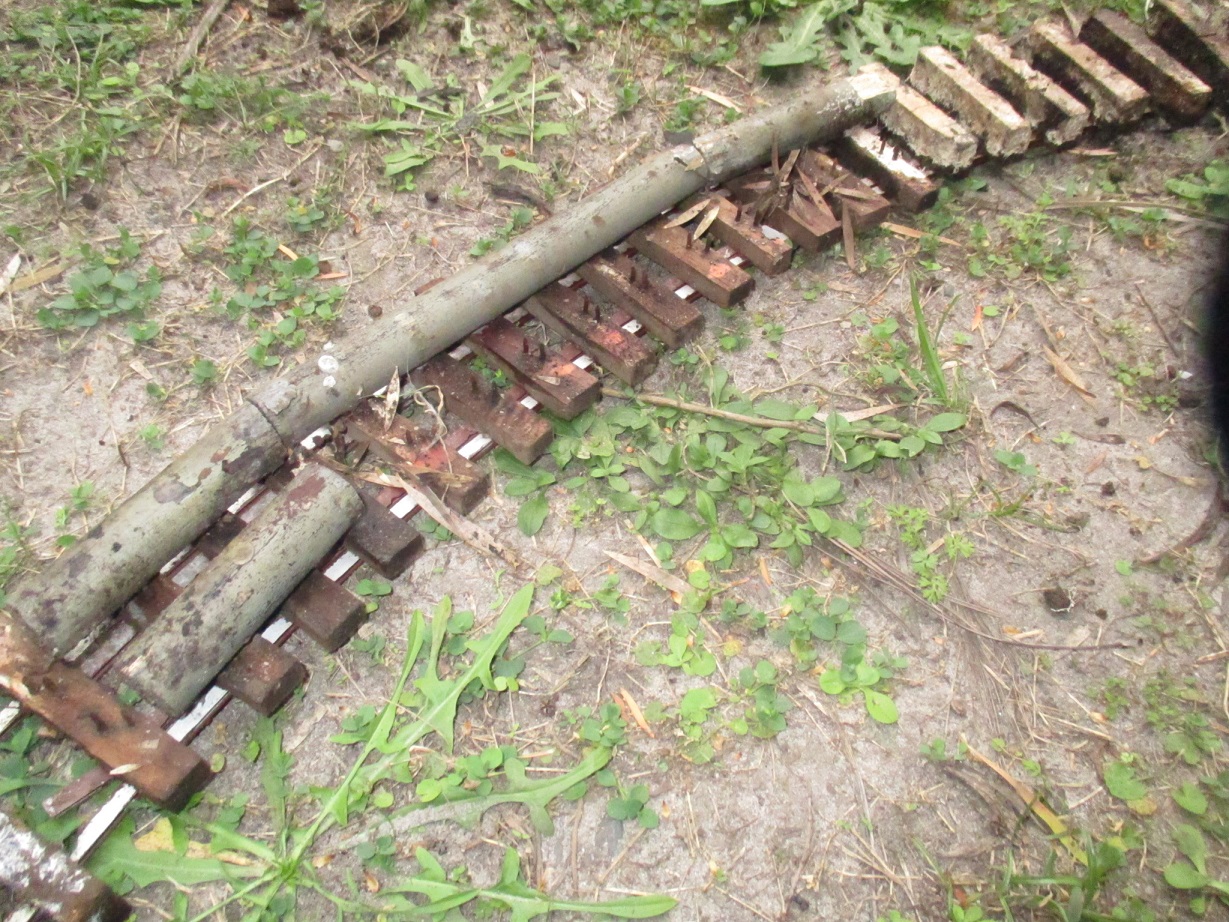
One joint wouldn't budge at all, so the coping saw was taken to it. Yeah, a hacksaw would've been better but I didn't realise I'd grabbed this one till I got back to the garden. "Fuck it"

I knew the sleepers in the cutting were bad, but fuck me sideways..


Looks like the remains of an ancient shipwreck.


All rail joints around the original line, even the new ones where the extension joins on, had to be heated before they'd let go.

About 90% of the sleepers need replacement. The other 10% is nearly as good as the day they went in!

I don't need to tell anyone this, but be careful with a blowtorch in the garden, will ya?

One joint wouldn't budge at all, so the coping saw was taken to it. Yeah, a hacksaw would've been better but I didn't realise I'd grabbed this one till I got back to the garden. "Fuck it"

I knew the sleepers in the cutting were bad, but fuck me sideways..


Looks like the remains of an ancient shipwreck.

An ideal backyard will be a consideration in finding a new house in the coming months, though the house itself will of course be the main thing. We've all agreed though: No units, and none of these new shoebox-sized "houses" made of styrofoam and mortar, all clustered in like sardines. Fuck that.
The new track will be all handlaid on cedar sleepers which I can get ordered in from Bunnings, and cut down myself. I should get 10-20 years out of that.
Will never afford the outrageous prices of proprietary track, unless I stumble onto one of those once-in-a-lifetime bargains.
The new track will be all handlaid on cedar sleepers which I can get ordered in from Bunnings, and cut down myself. I should get 10-20 years out of that.
Will never afford the outrageous prices of proprietary track, unless I stumble onto one of those once-in-a-lifetime bargains.
Points will be the normal type (not stubs), and I'll have a whack at building a set myself. If I can't get that to work, I'll have to buy proprietary points secondhand. *sucks through teeth*
Minimum radius for curves will be 4ft - double what I have at the moment.
A small shed will be built to store all the buildings in (even the outdoor-sealed ones) for longevity. Sugar mill's a lot harder though, because it's made of three parts. Will likely leave it outside, but cover it with a tarp or something..
So in spite of the knowlege I've gained, let's be honest: These last few years working on the extension were a huge waste of time and money - but then I honestly don't mind; I mean, what else am I doing?

I think that's the last of the huge albums copied over from Farcebook, thank fuck.
This one took seven hours to copy over, tweak, proof read and fix.
Just a dozen or so small ones to go, and from then on it'll all be new content..
This one took seven hours to copy over, tweak, proof read and fix.
Just a dozen or so small ones to go, and from then on it'll all be new content..
No comments:
Post a Comment