Back in October 2014, I bought a a secondhand Scientific Toys train set, with the
intention of kitbashing the rollingstock for the garden line, and using the track for temporary setups..
By the end of December, I'd bought some Roundhouse bogeys and couplers from a friend, then set about kitbashing the gondola and boxcar.
The lines on a lot of the photos are because the camera I had was on it's last legs.
Gondola ~ Open Wagon
29/12/2014
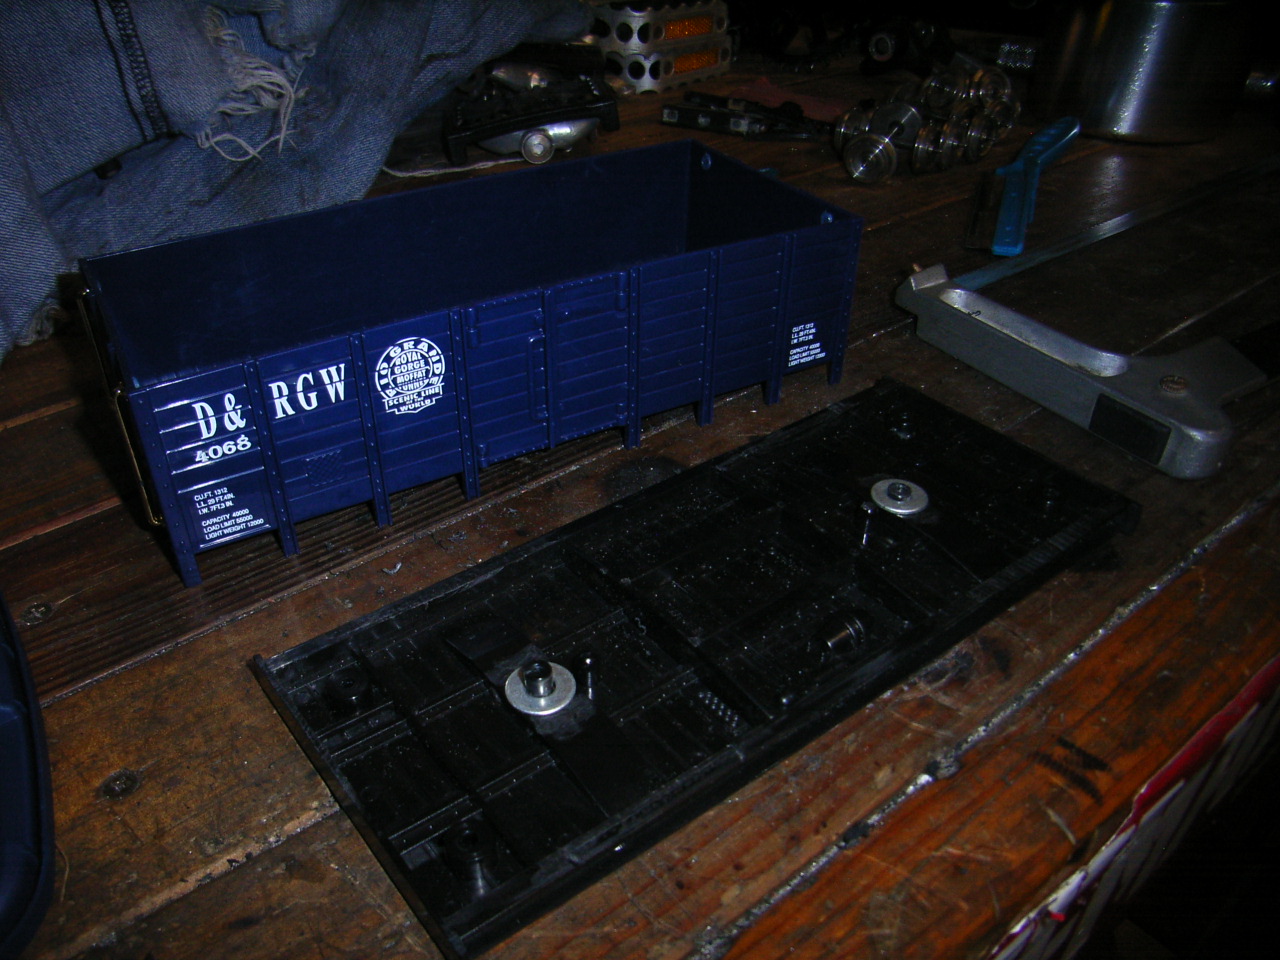
Here's what I started with.
I found this wagon very helpful for maintenance work, so I'm going to keep it.
I found this wagon very helpful for maintenance work, so I'm going to keep it.

Being held together entirely with screws, it was easy to take apart.
The fake axleboxes were carefully removed (to use in a future project)
Some minor trimming was also required so I could fit the washers on the original bolster pins, to act as bearings for the bogeys to swivel on.
Some minor trimming was also required so I could fit the washers on the original bolster pins, to act as bearings for the bogeys to swivel on.
The Roundhouse couplings needed their headstock mounting points removed, so the couplings could just be glued to the wagons. They've yet to be stripped and repainted.

The
pivot holes on the bogeys had to be enlarged with the drill.
I did the other two bogeys for the goods van at the same time.
I did the other two bogeys for the goods van at the same time.

01/01/15
The bogeys and couplings were taken apart and stripped in caustic soda.
Afterwards, I thought I'd reassemble them for a photo. Mmm, shiny objects.
I didn't bother stripping the bolsters as any finish defects wouldn't be visible once fitted to the wagon.
The bogeys and couplings were taken apart and stripped in caustic soda.
Afterwards, I thought I'd reassemble them for a photo. Mmm, shiny objects.
I didn't bother stripping the bolsters as any finish defects wouldn't be visible once fitted to the wagon.

02/01/15
The bogeys have all been primed, painted and cleaned up, ready for fitting. The dark red overspray was an early attempt at weathering.
The bogeys have all been primed, painted and cleaned up, ready for fitting. The dark red overspray was an early attempt at weathering.

04/01/15
As the bolsters are relatively high on this wagon, the floor needed some butchery for the bogeys to swivel freely..
As the bolsters are relatively high on this wagon, the floor needed some butchery for the bogeys to swivel freely..

I
chose grey primer for this wagon as it'll be easy to touch up,
following the inevitable scratches and damage that will occur from navvy
work..
After about four coats the body is done. Just needs the details picked out in black, couplers fitted and weathering.
After about four coats the body is done. Just needs the details picked out in black, couplers fitted and weathering.

08/01/15
The open wagon is finished.
Painted the details black, weathered the body with a black acrylic wash, followed by a thin brown wash for dust along the bottom of the wagon, including the bogeys and couplers.
Then, a rusty brown wash was applied to all the black parts for a rust effect.
For a first effort at weathering, I'm pretty happy with it.


Those grey bits are whitemetal castings left over from a HO boxcar kit, glued under the wagon for weight.

Boxcar ~ Goods Van
29/12/2014 The boxcar as recieved - pretty ugly, but there's potential.
I removed the American style roofwalk, as well as those oversized wheels and toylike couplers.

I removed the American style roofwalk, as well as those oversized wheels and toylike couplers.

Now the fun begins. I'll start by cutting the dummy axleboxes off the chassis, and enlarge the pivot holes on the bogeys so they'll reuse the original wheelset pivots molded into the chassis. The couplers and their mounting points will need some delicate surgery..

I cut off the dummy axleboxes and filed away the remains.
Some little knobs cast into the bolsters had to be removed, so I could glue a washer around the original pivots, to act as a bearing for the bogeys to swivel on.
Some little knobs cast into the bolsters had to be removed, so I could glue a washer around the original pivots, to act as a bearing for the bogeys to swivel on.

A nice change, this was a pretty quick and simple conversion to bogeys. They are even held on with the original screws!
Of course, I'll have to take it all apart to clean up the bogeys and paint it all flat black. After that, the chassis' done.
Of course, I'll have to take it all apart to clean up the bogeys and paint it all flat black. After that, the chassis' done.

I
got started on the roof by filling the holes that held the roof-walk
on. As you can see, I used way too much filler on my first go, pain
in the arse to sand back..

30/12/14
The ends of the body needed careful removal of some cast-on detail, to provide mounting points for the couplers. Three coats of grey primer were then applied.
The ends of the body needed careful removal of some cast-on detail, to provide mounting points for the couplers. Three coats of grey primer were then applied.

The doors didn't need any work done so they've got the first coat of primer as well.

First coat on the roof. Not sure what color it'll be when I'm done, either black or grey..

After
numerous coats of paint and filler, the roof finally has an acceptable
surface. After I paint the body with acrylic, I'll decide weather the
roof should be black or grey..
(in hindsight, I should've taken the plunge and tried that filler-primer I'd seen around)
(in hindsight, I should've taken the plunge and tried that filler-primer I'd seen around)

14/01/15
Bogeys are fitted.
Nuts and bolts were put through the floor to stop the bogeys from swiveling 360 degrees.
These nuts and bolts are ex-railway - holding the front buffers on the Nambour miniature railway club's 0-4-2. These were replaced with new ones as some of the originals were missing.
Bogeys are fitted.
Nuts and bolts were put through the floor to stop the bogeys from swiveling 360 degrees.
These nuts and bolts are ex-railway - holding the front buffers on the Nambour miniature railway club's 0-4-2. These were replaced with new ones as some of the originals were missing.

16/01/15
Goods wagon is finished - now to get my track in a good enough state to run on!
The body was painted in about 5 coats of an acrylic mix, brushed up and down to provide a timber grain effect on the planks.
Weathering was done similarly to the open wagon - an acrylic black wash, followed by a 'dusty' wash on the lower areas including bogeys and couplers, and finally a 'rusty' wash for the metal parts.


The roof was difficult to do, but I'm happy with it.
Careful use of sandpaper and misting black spray paint onto the roof provided the effect I'm after. I may add some rust at some point...
Careful use of sandpaper and misting black spray paint onto the roof provided the effect I'm after. I may add some rust at some point...

Truss rods were made in the usual manner:
Old bike spokes (or mangled coat-hangers!) were cut, and bent in the vice with a hammer.
Glued them in place, and painted/weathered once the glue was dry..
I forgot to trim that vertical one underneath.
Old bike spokes (or mangled coat-hangers!) were cut, and bent in the vice with a hammer.
Glued them in place, and painted/weathered once the glue was dry..
I forgot to trim that vertical one underneath.

I'm quite pleased with how these two have turned out, and would definitely recommend you grab those el-cheapo "G scale" train sets when you see 'em on sale or secondhand.
Being plastic, these two are quite robust, and get a lot of use. The open wagon in particular, being used on goods and maintenance trains alike. I eventually acquired a second similar one.
Since converting these in January 2015, I've made a number of improvements:
Since converting these in January 2015, I've made a number of improvements:
•Swapped out the Roundhouse steel wheels (nothing wrong with 'em) for Binnie 24mm curly-spoked wheels, like what's fitted to just about all Australian bush rollingstock. This required opening out the holes in the brass bearings from 2mm to 3mm. A lathe is best for this, but I didn't have one at the time, so I did it carefully with a vice and hand drill.
•The coupling hooks were bent away from the wagon bodies a bit to make coupling easier.
•Wiped the buffer faces with thinners on a rag, to give a used, dirty bare-metal look to them.
•Glue was found to be inadequate for holding the couplings on, so they were removed, drilled and tapped for an M3 stud-and-nut fitting, as per the rest of my couplings. No issues since.
•And finally, I eventually trimmed that bit of truss rod hanging under the van, and soft-soldered it all together. Superglue just shatters in a derailment. Solder won't.

No comments:
Post a Comment