My second HO layout. Built on the original table of the 1st layout.
Carried on from Part 1.
9/11/2015
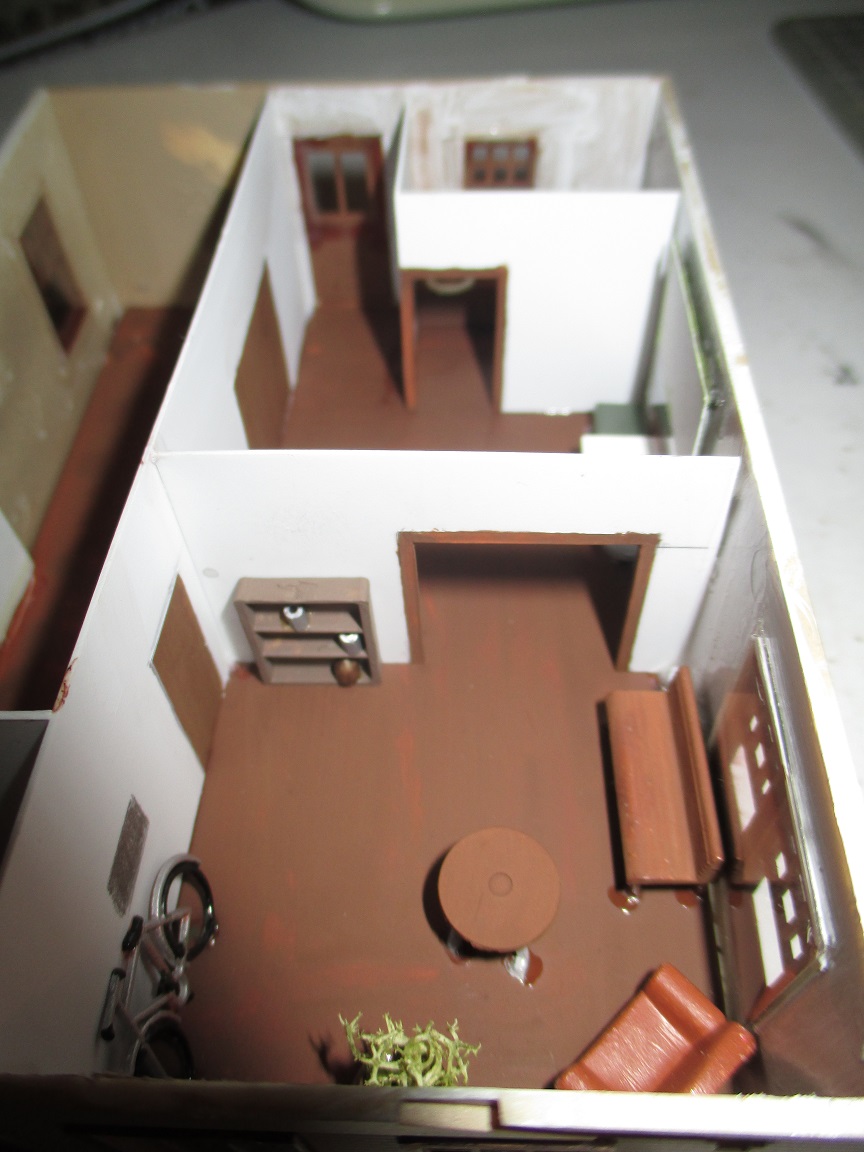
There will be a house in the town at the end of the branchline (Oakland). As the house will be close to the edge of the table, I decided I had to make and detail the interior..

The floor and walls are 1mm styrene. The walls aren't painted as their plastic sheen won't be noticed through the windows. All furniture is made from scrap box bits, exept for the armchair in the bottom right.
Doors/frames were measured, marked, then scribed with a knife to make it easier to paint them accurately. People are next to be added and the interior will be done.
Years ago I bought a Rix Products Maxwell Ave. Home Kit. Above is that original kit as used on my first layout. I really like this house but my previous workmanship was far below my current standards. (Not to mention the original is long gone)
So a new one was in order, (bottom) and I'm far more pleased with it. It will receive some minor weathering with pastels in due course..

17/11/15
The house at Oakland is finished, save for minor weathering.
Now that all three houses on the layout are done and ready to use, I'll build a small factory and a goods shed for Oakland.

There are paper light-blockers bent to a U-shape and painted black, glued in behind the basement windows. The basement floor was also painted black. Picking out the door handles in silver took a couple tries.

23/11/15
Another day of work, and a little closer to the mark.

The lawn for the house at Oakland was "sown", and the first tree was planted behind the church.
That tree was an experiment and I needed somewhere to store it while the glue on it dried, so I figured "Fuck it, just plant the thing." I'm not adding the rest of the trees yet, there's still heaps of things that need doing first..

The last pitiful attempt at making a flexible road surface was peeled up and replaced by some flexible, sandable filler (at least that's what the tube says). It will need a day or two to dry before I can attempt to sand it. I'm really hoping this'll work..

In yet another change of plans for the water areas, I decided to make the whole creek-and-lake bed the same dyed sand as the banks are. This will be painted to simulate depth like before.. Also some greenery was added to the near bank of the creek.


Further ground cover was applied in some of the bare patches, covering up my horrendous above-board wiring for the turntable and motor, and partially covering the point motor in the foreground.

27/11/15
After another two full days work, the scenery has a rather different look.

I recoloured some ground foam to a slightly reddish dark brown, to represent dead pine needles, etc. Before, the terrain was far too green for a Pacific Northwest (or maybe Californian) forest. At least, that's what I'm trying to represent.
Shrubs were also scattered about. Now all that's needed is tree stumps and deadfall, then the trees can start going in..

That "sandable" filler was exactly as sandable as the last filler I tried, but as I only put on a thin coat of it, I left it there.
I then decided to say "fuck this, I'm using plaster as I did originally, and fuck it when it cracks, I can't win" At least despite the overscale cracking, the surface and texture will be right..
Two coats of plaster down and smoothed while wet, so it should only need minor sanding.

That bottlebrush tree now has some dead brown stuff on and around it, looks much better up close.
The top of the tree is a different colour because it was very difficult to remove the majority of the wood glue after dipping it in, resulting in the top of the tree having a funny appearance. Should've soaked up some of the glue with paper towels, before rolling it in the ground foam, but it should be easy to blend it in with the rest of the tree.. Also, the tunnel portals were weathered with pastels and sealed with a matt clearcoat. They look much better in reality than in this photo.

Pretty happy so far.

The ballast shoulder was partially removed here, and a couple of small timber retaining walls will be built from matchsticks.

10/12/15
Finally, some success with the road.
The road was given 2 basecoats of a mid-grey colour I mixed up. The terrain adjacent to the road was given another coat of the scenery base colour.
The road was then weathered and blended into the terrain with pastels applied with the finger-painting method, followed by spraying with a flat clearcoat to seal it.
That pothole was an accident while I was sanding the road, and the thin plaster came off. Instead of fixing it, I painted it with a darkened road colour to simulate a patch, then weathered it.
It was all trial-and-error, but I'm very happy with this.
Of course it will crack in time, but at least with the roughish look of the road, it shouldn't stand out so much..

The retaining walls were also weathered using the same methods.

Sticks and twigs were gathered, and cut up into stumps and random deadfall. (I had bought some whitemetal stumps, but wasn't happy with my results painting them)
Stumps were both cut and broken, the cut ones supposedly being from the railway's distant logging past, and most of the broken ones are trees that have died from natural causes. (that's the idea anyway)
The white-ish looking areas look like that because the glue's drying. I use indoor pva where possible, but I've found watered-down matt medium from the cheap shop is better for anything on the visible surfaces, because it doesn't leave a satin sheen on things like pva does.

The lake bed has been coloured with pastels, though it still needs work.

The creek has had the same treatment, and will also need further work.

Twin culverts were added to the bottom of the lake, to provide some
kind of 'drainage' for the water coming into the lake via the waterfall. They were made from corrugated tinplate I had in the scrap box, leftover from an old craftsman kit I bought for parts years ago.
The tinplate was heated to red hot and cooled slowly to anneal it, then formed round an aluminium tube. The joints are lap-seams, and were soft soldered.
The rear ends of the resulting tubes were plugged with hot glue (to stop the "water" running out of them while it sets)
As I had neglected to paint the pipes before installing them (with the seams buried at the bottom), some rust has formed overnight while the scenery glue dried, and leached into the sand. This will require some minor remedial work..

Looking a bit more complete.

Some cheap bottlebrush pine trees were bought, and dipped in diluted wood glue.
The excess glue was wiped off back into the glue container, and the trees rolled around in a container of dark green ground foam, hugely improving their appearance. Once planted, a light sprinkling of brown ground foam over the top finished them. A pair of unmodifed trees is on the right.
This is a cheap way of making reasonably good trees, in this case just as a bit of 'filler' for the forest.

15/03/2016
Another 4 days spent on the layout has made a huge difference, with a lot of things done.
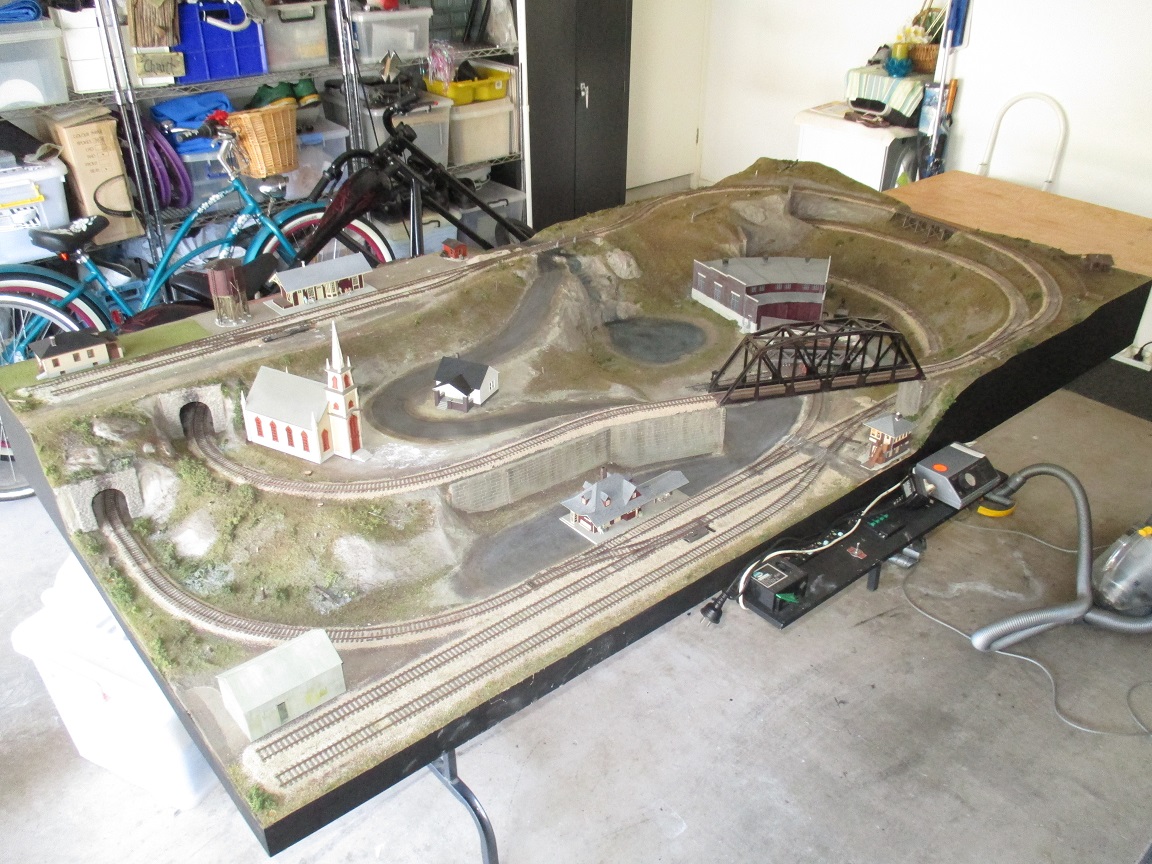
The first of which, another new controller was fitted to the layout, replacing the last one. This one is a handheld controller that I put a long cord on, so I can walk around the layout whilst still controlling the trains. (Will be very helpful for shunting Oakland yard)
Another 4 days spent on the layout has made a huge difference, with a lot of things done.
The first of which, another new controller was fitted to the layout, replacing the last one. This one is a handheld controller that I put a long cord on, so I can walk around the layout whilst still controlling the trains. (Will be very helpful for shunting Oakland yard)

I got round to making another batch of dyed sand to match the turntable tracks' ballast, and added another road for the Shay loco to sit on whilst it's restoration begins.
The ground cover was also finished around the ashpit (which still needs a paint touchup).

Groundcover was applied to the area left of the turntable, more gravel, and a coal stockpile added near the standpipe.

Steam locos can now be coaled (by hand!) and watered here.
The creek and lake have also been recoloured and I'm fairly happy with them. Might make them a little more green?

Some greenery has been added to complete the retaining wall. Mostly lichen for structure, followed by some ground foam for texture.

I decided I wanted the line to branch off here to interchange with another line. This allows me to have traffic running to and from this railway, and lets me diversify what I run, without going outside the realm of possibilty. (eg. good wagons coming and going from this part of the world, or another preserved steam or diesel loco could 'visit' from another heritage line, to run here)
I will build a small detachable fiddle yard to connect onto this spur, to represent the 'outside world'

I've finally done the groundcover for the church and house areas. The beige fence still needs touching up, hence the white post.
The headstones for the graveyard to the right of the church, are currently being weathered.

Big milestone this one, obviously trees were also added to the layout.
The taller bare pine trees aren't there permanently, they're just in as placeholders so I don't loose where the holes are, until I put the foliage on those trees.
More trees will be needed around the whole layout..

At Oakland, I'm making a sort of 'view block' with the trees, to try and separate the station from the rest of the layout. Helps make the layout seem bigger when you can't see the rest of it so well.

Another major milestone (for me anyway) was the installation of the phone poles.
I used an elastic thread called 'E-Z Line', which I found to be very good, the way it stretches if bumped. As expected though, adding the lines was a long and painful exersise.
All that remains for the phone lines is to run single wires off to the buildings..

02/05/16
I'm always busy working on something, and the latest thing to get done is the goods shed at Oakland. It will be installed shortly, however I still need to weather it, and find some workers to populate it..

04/05/16
Atlas hairpin fences installed along the carpark at the bottom yard, and Walthers chainlink fence sections are mocked up in the background..
A few more trees were also added and the lake given another couple of sealing clearcoats of watered-down pva, prior to pouring the 'water'..

The last of the trees I have on hand have been planted, so I shall have to get another two-hundred or so..

Scary time now, the first layer of the water has been poured. The lumpiness in the lake is because the lumps on the lake bed are showing through this first thin pour.

I'm using "Realistic Water" by Woodland Scenics. This stuff is a runny, cloudy blue coloured acrylic liquid that dries nearly clear.
I've used brass sheet and blu-tac to dam the ends of the creek while it sets; I then set up the plastic dropsheet over the 'water' to protect it from any dust..

The control panel has recieved some much-needed labels and diagram, as I forget what does what, even on a panel this simple.

20/05/16
The tree elves have been busy, with another 72 pines made.
Like these, most of the trees on the layout are Woodland Scenics kits. With this batch of 3 kits, I decided to make these a little different by actually painting the trunks and cutting off the lower branches, resulting in a much 'piney-er' tree.
This lot took the elves a full day to make, with each tree averaging 5 minutes all up, assembly-line fashion but not rushed.

The trunks were randomly painted with several different washes, resulting in an inconsistent appearance.

Not too many more trees to go now, another 2-3 packs or so should do it.

The water has had another pour as the first coat has dried. Here, the second coat is setting.
Annoyingly, the water cracks as it dries (shrinkage), which will be interesting trying to fix...

Oakland station has had it's carpark fence put in along with the footpath for the imaginary road.

Starting to look something like I want it to. During testing, I'd found some locos and wagons liked derailing here. The guard rail stops that.

12/06/16
More "testing", this time I'm moreso checking new locos and stock rather than the track.

A Powerhouse brass 2-4-4-2 logging Mallet (repaint/mods not yet done) is put through her paces.

05/08/16
The chainlink fence finally installed around the loco compound. While I would certainly reccomend this Walthers kit, I gotta say it's really fiddly (Yup. Bold, italic and underlined). So make sure you've got a couple pairs of tweezers and a lot of patience. The rust effect was just an overspray with the airbrush, after painting silver with an ordinary aerosol can.

06/08/16
The lake has had another 2 coats of water poured, with the final pour having the immersed details put in.
The cracks that form in the water as it sets will be filled in with the "water" liquid, applied with a small brush, and waves will camoflauge the rest.

07/08/16
The reeds have been added to the creek up top


09/08/16
More trees have been planted. Will still need yet more in many places...

The road crash barriers were installed, along with the hedge planted around the Rix house.

Looking up from the loco compound.

Up towards the bridge at Oakland.

Will be good to see the logging locos snake through this..

17/08/16
After 8 years of wanting one, finally bought a Bachmann 80 ton Shay. Of course a "testing" session was in order..

Gotta cover up those nasty gaps at the bases of those trees to the right.

Again, sorry about my inability to make my camera focus, even in macro mode..

18/08/16
Been meaning to get one of these for the layout! But it wasn't cheap - $60aud including $15 postage. This one is correct HO scale, but will need some details picked out, a matte clearcoat and a driver. The front axle will also want looking at. As you can see, it sits a bit high..
Been meaning to get one of these for the layout! But it wasn't cheap - $60aud including $15 postage. This one is correct HO scale, but will need some details picked out, a matte clearcoat and a driver. The front axle will also want looking at. As you can see, it sits a bit high..

14/10/16
The Delorean's had some details repainted to the correct colours, followed by a very light blackwash to bring the nice casting detail out. A suitable figure was found and repainted to represent Mr. Mcfly. Annoyingly, my flat clearcoat didn't want to dry very flat on him. I didn't have anything suitable to use as Dr. Brown though. (not without torturous, fiddly reworking anyway)


31/10/16
Been a while since the last update, but as always I've been busy working on something or other.
Part of the fence here has been extended along the edge of the table and some more trees added near the line, for privacy..
Been a while since the last update, but as always I've been busy working on something or other.
Part of the fence here has been extended along the edge of the table and some more trees added near the line, for privacy..

The depot area has received some detailing. A yard limit sign on the mainline, some wheelsets on the wheel track, general yard scrap/junk..

..more junk and bits of rail, and a pallet for heavy parts removed from the Shay to be moved inside by forklift.

The
lake has received a final thin layer of "Realistic Water" liquid.
Surprisingly the thin coat dried nearly overnight so a start was made on
applying the "Water Effects" paste for splashes.
Some people and a pair of 3D printed picnic tables (the latter from Ebay) were placed with the help of a fine-tipped superglue applicator.
When I got the layout down this time, I found the woman standing in the water at the shore had fallen down face first. I wasn't able to stand the little bitch back up and some of her paint stuck to the water when I pulled her off, also leaving her feet in the water.
So I cut the bit of water with the feet out, back to the sandy bed, and glued that big guy in there to hide the damage, followed by the last layer of water..

The waterfalls have been given a few layers of "Water Effects" paste. Good stuff, this. It's white but dries clear. My first time making a waterfall and it's pretty easy not to muck it up.
More layers will be required when this lot dries, then I'll drybrush some acrylic white on it to simulate frothing..

A couple weeks back, most of my HO vehicles had some extra details picked out and the bodywork matt clearcoated.
The fragile parking lot fencing I damaged was fixed, and the cars installed, again with the help of the fine superglue applicator.

The headstones had been painted and weathered awaiting installation for months, only just now got round to it. Still got a couple unpainted ones left, should add those too methinks..

Other people have been added here and there on the layout..

The phone pole here was bumped over months ago and I've just got round to making a brace out of rail and styrene channel to hold it up.

A little side project I've been working on. I'd always wanted to put funny signs on the layout but it took years to find one I liked enough to use.
The top right corner of the paper image was slightly water damaged by a weathering wash (should've done that before gluing the picture on, dickhead), so I'll hide it with some foliage later, and the ground around the posts still needs touching up..
Also added some people to the green minvan prior to matt clearcoating and gluing it to the road.

31/10/16
A bewildered time-traveler is on the other side of the road, trying to make sense of this weird billboard.
Marty's glossines is exacerbated by this poorly focused photograph. My camera isn't great at closeups regardless of settings.
Marty's glossines is exacerbated by this poorly focused photograph. My camera isn't great at closeups regardless of settings.

08/02/2017
I decided to make a start on the removable fiddle yard, here showing the current idea for the track layout. More than enough sidings for my modest fleet.
Should be helpful when I have friends over to run their trains on my layout.

A scene out of the movie Step Brothers, where Brennan is buring Dale alive - only in the graveyard, rather than Dale's front yard.
The figures are modified Woodland Scenics figures, and the dirt is ground allspice from the cooking isle. Seems to do the job.

A laser-cut wooden fence (from kits) has finally been installed around the house at Oakland. Only been putting this off for a year, but it was quite easy really.. *rolls eyes*
The driveway was also graveled.

A navvies shed has been assembled, to be part of the Maintenance Of Way yard, opposite Oakland station. I think it was a Tichy kit. There's a handcar in the kit, too. That was extremely fiddly to build - it'll all be permanently installed later..

Oakland station carpark was finally graveled with dyed sand ground to a powder in a mortar and pestle, and sifted onto the carpark. Some pastel weathering will follow..
And of course, that tragic fucking cliche of the dog pissing on the fire hydrant.

A major improvement to the layout has been the addition of static grass. I built a simple static grass applicator using this video tutorial. I quite enjoy this guy's other videos too.
Also, my remaining dyed brown ground foam was ground up finely, mixed with some bark etc, and used to blend the ballast edges in with the surrounds. Thanks very much for the suggestion, Tony. A great improvement.

It seems I've planted my first mariajuana crop.
This hillbilly-run farm should make for an interesting backwoods scene.
The marijuana plants were made from pipe cleaners and ground foam.
Apologies for the poor quality of photo, this end of the layout was in the dark end of the garage at the time.

My time working at the Woodford Railway has taught me just how much old junk a museum/heritage railway ends up with. Various components were bought, made or found in the parts tin, painted/weathered and installed around the yard.

The points at the Oakland branch junction. I managed to damage the throwbar beyond repair (can't remember how, here in 2018), and had to replace it. Now installed and awaiting ballast.

My mate Ben asked for some pics of Shay No.2 on the layout, so I gave her a test run..

I was also testing some newly-built log skeleton kits.


26/03/17
The fiddle yard has progressed quite a bit. Frame built and clad, mounting bolts and bushings fitted. It was bolted to the layout to set up the track connection, and the first piece of track attached securely for accuracy.
The module has been built entirely with scraps, save for the handles. Will need to get one more..

Instead of the cork roadbed I used on the layout, I just used 3mm MDF I had on hand to save money. At shunting speeds, the solid roadbed doesn't make any noise like normally expected with running speeds.
Duct tape was used to smooth out the transition in height from the edge of the extension (to match the layout height) and the yard roadbed. Couldn't have been bothered with paper-mache for such a small job.

4 of 5 points I'm using for this are old Mehano brass stuff I got for $5 each. As this is only a fiddle yard I thought I'd take the risk and try brass rail here. Should be fine though, as I have to clean all my track before every running session anyway, due to it's infrequency of use. All rail joints where brass rail is involved, are being soldered to ensure complete electrical continuity in the long term. I found I needed both my cheapy 15W iron and the pencil-torch iron to compensate for the rails pulling the heat away.

I decided to try making centre-over springs for these points, as I didn't want those horrible black point boxes visible anywhere on the layout.
These springs were made from music wire, and hold the points in either position, while allowing the operator the switch them manually.
They've been a big success and will be implemented on the other manual points on the layout, and even on my G gauge points.

30/03/17
A suitable plastic lid was found to use as the switchboard for the sidings.
A piece of styrene was glued on the underside, as the plastic lid was very brittle and was cracking from just hand-drilling the pilot holes for the switches.

Testing electrical coninuity revealed the points weren't transferring power though all the rails, due to the age and material of the rails and connections.
Some copper armature wire was stripped of it's isolating coating, and put to work hardwiring the points, and the solder joints ground back to clear the wheel flanges. These points now work like new.

03/04/17
Track down, terrain basecoated, and the wiring for the fiddle yard is complete. Now to make the power connection on the layout and give the new track a proper test.

10/04/17
Where needed, bumpers were added some time ago, I just forgot to mention them till now.
They are weathered using the salt technique to simulate rust coming up and peeling paint.

13/04/17
A full day was spent working on details of the layout; here the trusses for the bridge at Oakland are now permanently fitted.

I've now used up all my HO cars, will have to get some modern-day ones to finish the automotive side of detailing.

The signal box is now permanently installed and blended into it's surrounds.

The crossing signs are finally installed as a finishing touch at the signal box. Bought these Rix kits over a year ago..

In typical fashion, there are 2 people actually working, and 5 watching..


A better (still not great) photo of the weed crop.
The cabin has had some minor weathering but it doesn't show up well on camera.

The waterfall was given another layer of water effects, then ripples and reeds planted added to the lake.

The navvies shed at Oakland is also in permanently.

The water tank at Oakland has been revamped with a decent weathering job which unsurprisingly, doesn't show well on camera. Now permanently installed.
Static grass was applied in a patchy fashion to the base of the tower prior to installation on the layout. A little more around the tank will blend it in nicely.

Some styrene strip was bought to make some sleeper piles with. Cut them to length, distressed some of them to simulate wood grain, and painted.

02/06/17
Testing some new log wagons and a caboose.

The aformentioned sleepers were glued into a stack and placed in the navvies yard. The handcar shed was at last installed.

Some clearance issues have been noticed with the Shay and the RS3. Here, some ballast has been removed. A little careful reballasting and paint will re-hide the unsightly point motor. Yes, that's rust from the nikel-plated steel terminal screws, bleeding throught the ballast.

Oakland station has come back to the workbench for some repairs and improvement.
The brick base has been painted with various washes to better represent a brick platform.
I've no clue why the base has recessed areas around most of the walls so the only thing I could think of was to make them into garden beds. Much better, IMHO.

Some extra patrons were also added to the platform, along with spare benches and people added inside, as the building was noticeably empty being at the edge of the layout.

The headshunt at Oakland was extended to the edge of the table to accomodate the mallet - it just fits! The new fishplates will be painted sometime..

The church also came back in for minor weathering and to have the phone line hooked up.
The house across the road was also connected.

The still-unnamed bottom station got connected and minor weathering as well.

Got the fiddle yard attached, wired up and working nicely after a few minor tweaks.
Basic scenery yet to come..
It's temporarily sitting on a small table and leveled using bricks and MDF scraps. Need to think about some hinged legs...

The track connection had me concerned but it's worked faultlessly thus far, so no complaints.

The power connection is simple enough for electronic fuckwits like me to understand..

21/10/17
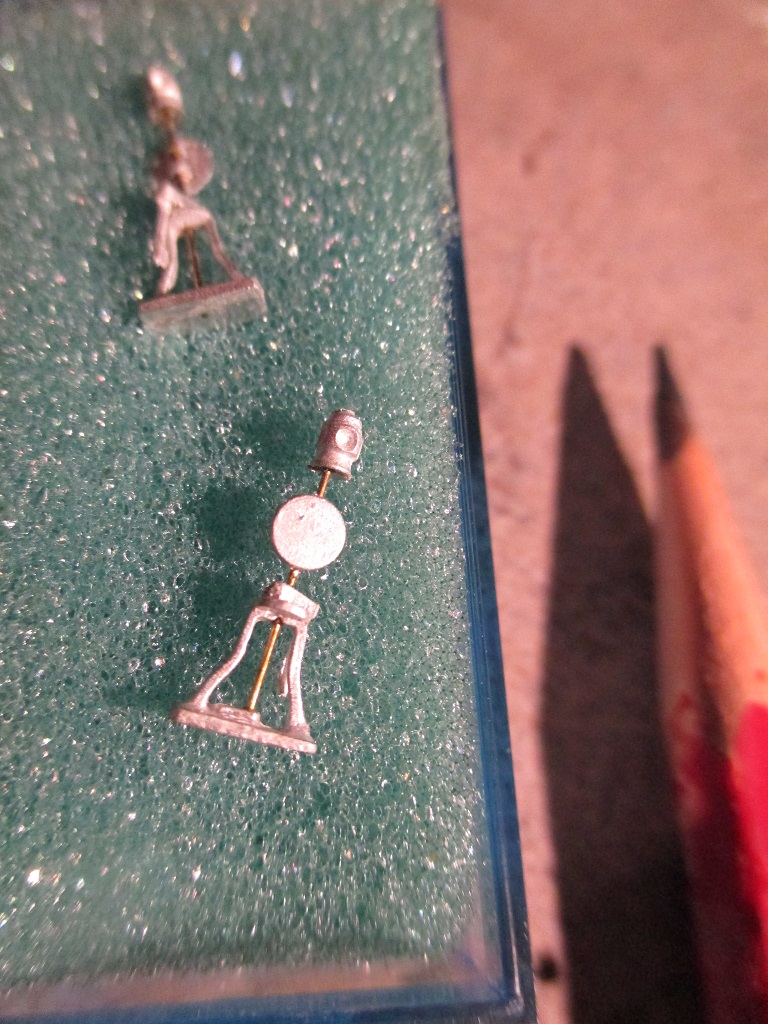
I saw these Yankee-style point levers (switchstands in Yank terms) 6 months ago at the last Zillmere open day. I've regretted not buying them since, so I was pretty excited they were there this time around. The pencil is for scale - they're tiny.
Problem is, these things are expensive to buy new. I'm gonna have to make a bunch more from scratch. Fuck..
04/05/2018
At the time of writing this, I'd scratchbuilt the rest of the dummy point levers, but have proceeded to have lost them in storage somewhere.As the unit I'm living in has just sold, I'll be moving soon. I'll design a bigger, better layout to fit within my new cave (bedroom) - wherever that'll be. For now however, the layout being in the garage makes it relatively easy to take out into natural sunlight.
That, coupled with some backdrops, would make for some very nice photography, before this still-unnamed layout's inevitable demise..
No comments:
Post a Comment