Another album moved over from Farcebook..
Back in the 80s, Dad had one of these given to him as a birthday present. Well, actually it was a Minor 1 engine, not a Minor 2. But I've found it very difficult to find Minor 1s so this is close enough - until I see an MM1 for the right price anyway..
His was meths fired with a vaporising burner, and he seems to remember it had a water level plug in the end of the boiler. This puts it as a 1970s model, but pre-1978 when they changed to tablet firing to protect the fucktards from themselves.
I was taken aback to hear after a few years of playing with it (with no lubrication or cleaning) Dad sold it for around $10 at a garage sale.
Being a sentimental bastard, I kept an eye out for another minor engine for the next 3½ years..
Fast-forward to September 2016, I found this one one ebay in Britain, for all of $91AUD + $25 post.
This'll be a fun restoration with some new challenges..
September 2016, the engine apon delivery.
It's been rather messed with, this one.
The base and firebox have been crudely repainted by brush at some point, the paint on the base peeling badly. Rust is bubbling under the non-original green on the firebox and the original Mamod decal shows through.
Obviously the base and firebox will be stripped back and repainted, and of course I'm not planning on using the tablet burner tray!
It's not seized at least; In fact, I hooked a bike pump up to it and despite a leak from the chimney rivet, she actually runs pretty well, considering the damage. So I won't need to touch the piston or cylinder bore, besides cleaning.

At some point, either the engine has fallen onto a hard surface, or something heavy fell on it.
The chimney bore the brunt of the impact and transmitted it to the boiler, denting it. The chimney weirdly shows no signs of damage whatsoever..
The end cap will need to be unsoldered to fix the dent. The copper pop rivets holding the chimney and green engine bracket will also need to be drilled out and replaced.

The safety valve is the only part missing. In the short term I'll likely share the safety and meths burner from Anzac, my TE1A. The engine bracket paint seems to be in good shape, I'll likely leave
it as is after I clean it - Somehow I highly doubt I'll find heat
resistant paint in apple green.. There is a little play in the engine bracket bearings, so I may yet make some little bronze bearings for it..

21/10/16
I've drilled out the loose copper rivets and de-soldered the end cap.
Nice crusty coating of calcium and lime etc.
I've drilled out the loose copper rivets and de-soldered the end cap.
Nice crusty coating of calcium and lime etc.

When
drilled through, the bottom of the rivet drops into the boiler. There's
also a blob of loose solder that's been rattling around.

22/10/16
The two rusted screws holding the boiler band and the rest of the engine together, were ground away and the engine disassembled.
The two rusted screws holding the boiler band and the rest of the engine together, were ground away and the engine disassembled.

One of the reasons I don't burn those horrible cat shit tablets.

24/10/16
After degreasing all parts and soaking the boiler and chimney in vinegar for an hour to clean them internally, it was noted that some of the original lacquer was still on the chimney. Personally I'm not a fan of lacquering brightwork so it'll be buffed off.
After degreasing all parts and soaking the boiler and chimney in vinegar for an hour to clean them internally, it was noted that some of the original lacquer was still on the chimney. Personally I'm not a fan of lacquering brightwork so it'll be buffed off.

The
degreasing and vinegar did remove the oily residues, but it's mostly
baked on. A session with the brasso should get that sorted..

The boiler was soaked in neat white vinegar for an hour, then flushed thoroughly with water.
Works pretty nicely.
Works pretty nicely.

The dents in the boiler have been fixed. I'd never done this kind of thing before and it's actually really easy.
The boiler was annealed, cooled, placed over a 1½" wooden dowel (section of old curtain rod!) and the dents gently tapped out with a nylon faced hammer.
It took three cycles of annealing and hammering until I was happy enough with the surface.
The boiler was annealed, cooled, placed over a 1½" wooden dowel (section of old curtain rod!) and the dents gently tapped out with a nylon faced hammer.
It took three cycles of annealing and hammering until I was happy enough with the surface.

After bringing the boiler back to the workbench I noticed a small section had chipped away. This is rather worrying, I hope the boiler hasn't suffered from de-zincification. Only way I'll find out is filing away the solder to get a better look at the brass...

25/10/16
A session with the dremel confirmed my fears, this boiler is suffering from moderate dezincification (kinda like cancer for brass, for those who don't know).
The copper coloured bits is where the zinc has leached out of the brass over time, leaving brittle, porus areas of copper.
A session with the dremel confirmed my fears, this boiler is suffering from moderate dezincification (kinda like cancer for brass, for those who don't know).
The copper coloured bits is where the zinc has leached out of the brass over time, leaving brittle, porus areas of copper.


The problem is evident inside and out, in spots all around the end of the boiler.

Dezinc tends to go for the ends of a boiler, rarely is the barrel affected.

I
didn't get a photo of inside the end cap but the dezink seems minor.
It's widespread but not all the way through. I tinned the whole inside
of the endcap to make sure it's sealed though, save for the flanges
which need to be a tight fit around the barrel.
There is a really tiny amount of dezink at the other end, but I doubt it'll be an issue.
There is a really tiny amount of dezink at the other end, but I doubt it'll be an issue.

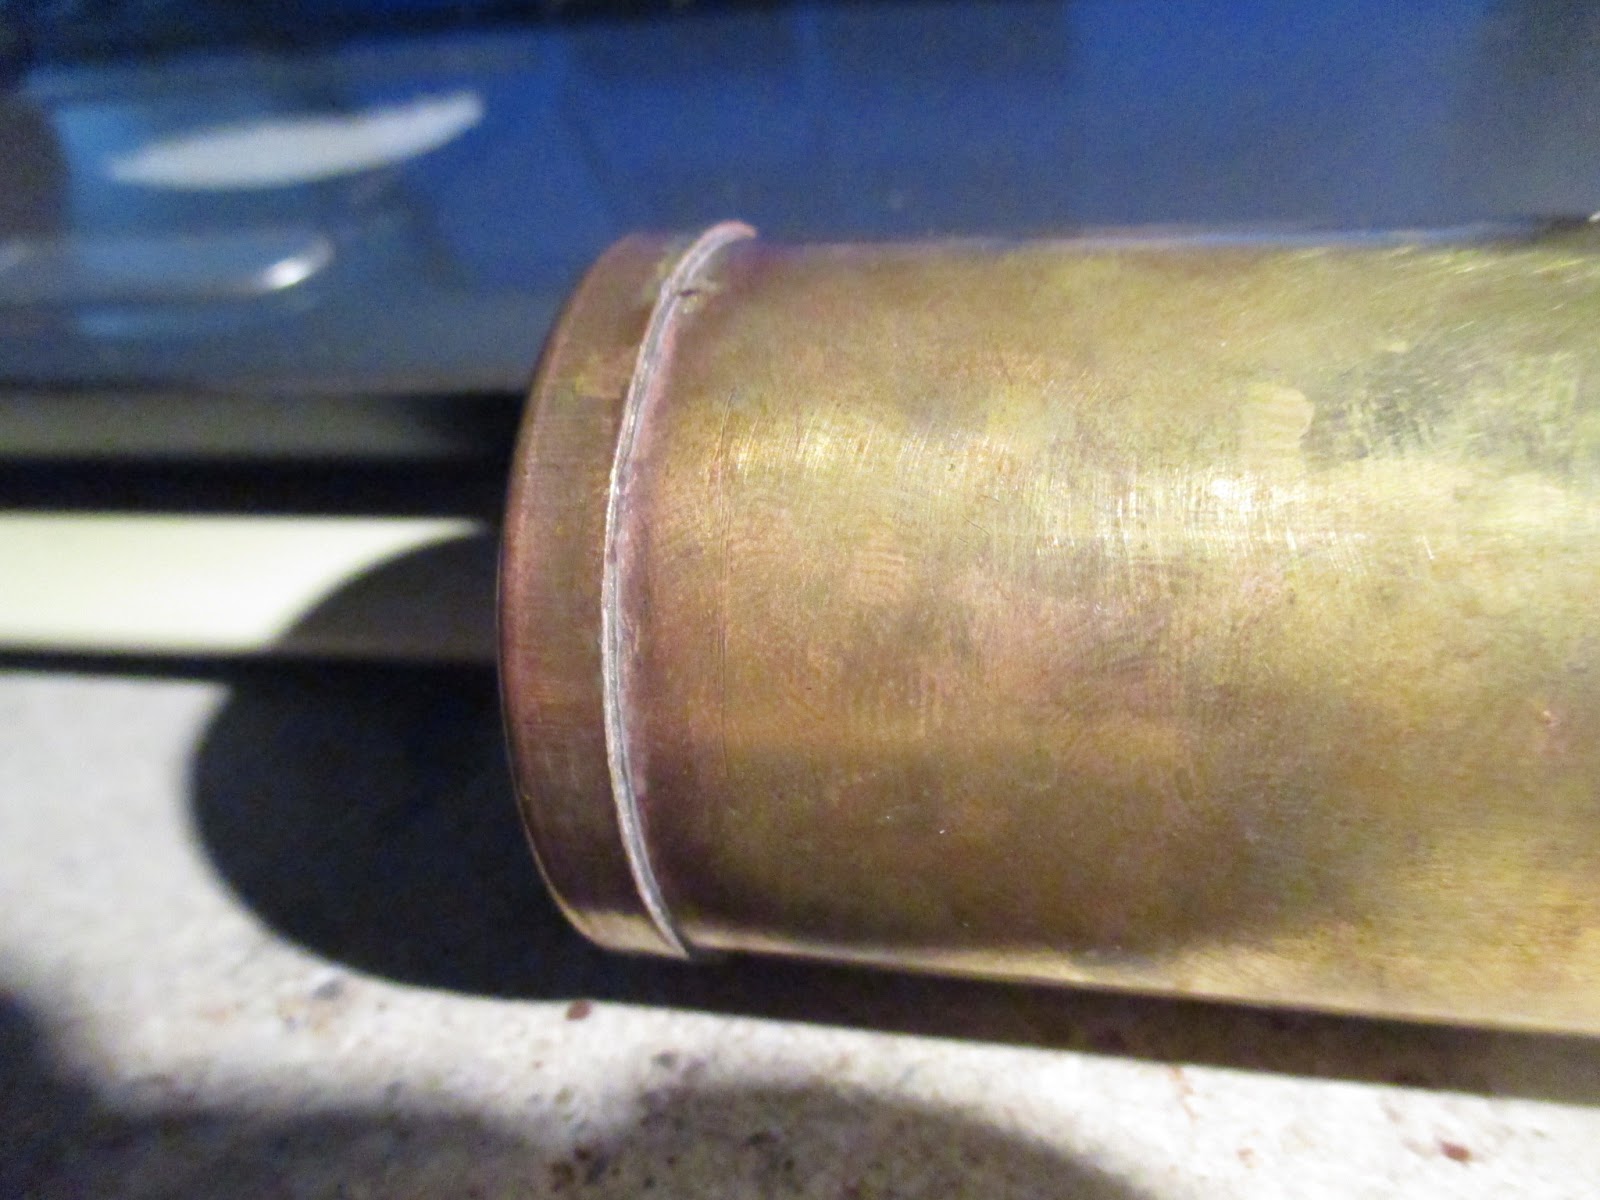
I decided to have a go at repairing the boiler to make sure it won't develop a leak in the future.
First I tinned the entire circumference inside the barrel at this end, 20mm down.
I then cut a piece of thin brass, a little thinner than the original boiler material, and rolled it to a snug fit inside the barrel. This was then fluxed and tinned on it's outer side, prior to inserting and soldering it to the inside of the barrel.
There was no evidence of dezinc around the top of the barrel inside or out, so I didn't bother making the internal patch to go up there.

The
corner of the flange in the end cap was then fluxed, the cap pushed
onto the boiler, and the boiler stood on the end cap on a firebrick and
heated till the solder melted, rejoining barrel and cap.
After coming out of the citric acid bath, here's how it now looks. It's actually tidier than it looks here, and will improve when I've polished the boiler.
I can't yet pressure test the boiler as I'm waiting on the sealed copper boiler rivets to reattach the chimney and engine bracket. Should be alright - should...
The remaining parts have been degreased and are in varying stages of cleaning and stripping..

2/11/16
I started stripping the base, firebox and flywheel. Thought it'd be worth getting a photo of the orignial decal before I kill it with the steel wool.
It was surprisingly tough compared to the layers of paint..
I started stripping the base, firebox and flywheel. Thought it'd be worth getting a photo of the orignial decal before I kill it with the steel wool.
It was surprisingly tough compared to the layers of paint..

17/11/16
The new parts and some wire wheels for the dremel arrived today.
The steel parts have been soaking in diet coke for 1½ weeks which has neutralised the rust in them. The wire wheels will be used to remove the remains..
The new parts and some wire wheels for the dremel arrived today.
The steel parts have been soaking in diet coke for 1½ weeks which has neutralised the rust in them. The wire wheels will be used to remove the remains..

18/11/16
I've wire wheeled the steel parts and finished cleaning the mazac flywheel.
Soaking the steel parts in diet coke to neutralise the rust has worked quite well, though it's more as insurance in case I missed any rust during wire-wheeling; But I'm pretty sure I've got all of it off anyway..
The chrome plated boiler strap will likely be replaced, as rust has come through both sides of it, and I'm not happy with it unless it's near perfect.

21/11/16
Refitting the chimney requires a rivet gun long and small enough to fit down the chimney. I don't have a rivet gun that fits, so I decided to solder the chimney and rivet to the boiler.
The copper rivet & hole in the boiler are tinned, the rivet tail is cut off..
Refitting the chimney requires a rivet gun long and small enough to fit down the chimney. I don't have a rivet gun that fits, so I decided to solder the chimney and rivet to the boiler.
The copper rivet & hole in the boiler are tinned, the rivet tail is cut off..

21/11/16
..And the rivet is inserted through the hole in the chimney base and into the boiler. The rivet head was fluxed, and a ring of solder wire was placed around the head with tweezers.
The boiler was then heated to melt the solder, sealing the joint.
..And the rivet is inserted through the hole in the chimney base and into the boiler. The rivet head was fluxed, and a ring of solder wire was placed around the head with tweezers.
The boiler was then heated to melt the solder, sealing the joint.

21/11/16
The engine bracket and steampipe were refited, and the sloppy original soldering cleaned up somewhat.
An air presure test at 20 pounds was carried out with the boiler submerged. No leaks!
Normal operating pressure is around 7-15 pounds.
The assembly was then cleaned and polished up.
The engine bracket and steampipe were refited, and the sloppy original soldering cleaned up somewhat.
An air presure test at 20 pounds was carried out with the boiler submerged. No leaks!
Normal operating pressure is around 7-15 pounds.
The assembly was then cleaned and polished up.

The
base, firebox and flywheel were painted with etch primer, then
engine enamel, followed by a gloss engine enamel clearcoat - the latter
requiring baking in the oven at 200°C for an hour. This is a bit smelly
though..
For some reason, the clearcoat wrinkled in many places on the firebox during painting. I've used these paints many times before, the weather was good, and I always follow the instructions, so this is a bit weird.
As the clearcoat won't cure until it's baked, I put it in with the other parts, and will sand the affected areas, repaint and bake another day..
The base and flywheel are coming out well, though.

I
decided to see if the boiler strap was salvageable, so it was wire
wheeled to remove the chrome plating, back to bare steel, and polished.
The scratches visible in this photo are invisible in reality. Now to
decide on a way to keep it fom rusting - hi-temp clearcoat, or oil?
Don't really like either option..

24/11/16
The firebox paint was sanded back, cleaned, resprayed and baked; this time it's business as usual.
The decals I bought however, are by far the worst I've ever used. 2 cracking, disintegrating decals that somehow won't settle onto the surface is the best I got from these.
The firebox paint was sanded back, cleaned, resprayed and baked; this time it's business as usual.
The decals I bought however, are by far the worst I've ever used. 2 cracking, disintegrating decals that somehow won't settle onto the surface is the best I got from these.

When
I painted the inside of the chimney, I masked off the whole boiler, engine frame and chimney outside. But when I removed the masking tape, it removed some of the green paint from the engine frame, enough to
warrant me repainting it. That's annoying, as it was just good enough to
leave it original, and will have to drill out the copper rivet to remove the bracket from the boiler.
Unsurprisingly, you can't get heat resistant paint in this colour, so I bought some green and white engine enamel and mixed up a reasonable match to the original. Needs some yellow to improve it but I'm not really willing to pay $16 for the tiniest bit of yellow heat paint and have no use for for the rest - like, ever.
I'll airbrush the bracket with the current mix and if I'm not happy I'll fork out for yellow paint.

28/12/16
I've heard from many people that "Flywheel61" on the Mamod Forums makes excellent reproduction decals for those restoring Mamod or Meccano engines. I bought some from him (turns out he's only 3 hours away) and they're some of the best I've ever used. The gold colour in them is even metallic!
I think I know who will be suppling decals for any future Mamod restos I do..

2/01/17
As the paint dried, it's gotten a little darker still which I didn't expect. Kind of a cross between Mamod apple green and Mamod mint green (the latter being the original colour in this case).
But for the pain in the arse it is to clean out the airbrush every time I use it, I'll likely call it "good enough". The paint is yet to be cured in the oven and buffed, it went on a little dry so it's come out with a satin sheen..

06/01/17
in an attempt to prevent the firebox paint from going to shit after a few firings, as what happens with Mamods as standard, ceramic insulation blanket was glued with JB Weld inside the firebox. I may yet make and fit an internal firebox to further protect the paint..
As I had not yet clearcoated over the firebox decal, I managed to damage the decal while fitting the insulation. the decal will be removed, replaced and promptly clearcoated..

15/01/17
I bought some alummium sheet from the K&S rack at the hobby shop, and set about annealing and cutting a new boiler strap from it.
New one on the left.
I bought some alummium sheet from the K&S rack at the hobby shop, and set about annealing and cutting a new boiler strap from it.
New one on the left.

17/01/17
A meths burner was constrcued from brass sheet, to fit inside the original tablet tray without resorting to modification.
Yup it's crude, but it works.
A meths burner was constrcued from brass sheet, to fit inside the original tablet tray without resorting to modification.
Yup it's crude, but it works.

As
the MM2 doesn't have a regulator valve, I made the burner output
adjustable, to regulate the steam generated and hence the speed of the
engine.
At full tilt, the engine runs so fast it'll vibrate itself around and off the table.
I tested the burner with my Wilesco D10, does it's job nicely. It also highlighted the need to look at the D10's noisy bearings - A project for another time..
At full tilt, the engine runs so fast it'll vibrate itself around and off the table.
I tested the burner with my Wilesco D10, does it's job nicely. It also highlighted the need to look at the D10's noisy bearings - A project for another time..

After removing and replacing the damaged decal, the firebox was clearcoated and baked.
The ceramic insulation was then disguised with thinned potbelly stove paint.
The ceramic insulation was then disguised with thinned potbelly stove paint.

The engine bracket was given a gloss clearcoat, baked, soldered and riveted back on.
A little touchup is needed to hide the heat damage from soldering the steampipe to the bracket.
Funnily enough when I got the engine I noticed the original bracket paint was also heat damaged during soldering at the factory, and subsequently touched up!
A little touchup is needed to hide the heat damage from soldering the steampipe to the bracket.
Funnily enough when I got the engine I noticed the original bracket paint was also heat damaged during soldering at the factory, and subsequently touched up!

I
forgot to photograph it, but the flywheel was fitted to a spare Mamod
crankshaft, the shaft put into the lathe chuck, and I skimmed the paint
from the rim of the flywheel, taking very slow, light cuts at the lathe's highest speed of about 670rpm. While I was at it, the rim was also polished.
25/01/17
After final assembly, a minor tweak, paint touchups and more polishing, this 1978 MM2 is pretty much as-new.
Good fun!
After final assembly, a minor tweak, paint touchups and more polishing, this 1978 MM2 is pretty much as-new.
Good fun!

I got up early and brought her down to the creek bank for some nicer photos.

The "minor tweak" was shortening the boiler strap and fitting square washers to it's feet.
The fit was very slightly loose, just enough to let the boiler to roll over when vibrating at high rpm.
The fit was very slightly loose, just enough to let the boiler to roll over when vibrating at high rpm.

The burner makes a great job of keeping the speed in check, and easily adjustable too!

Video of the engine in steam (just to prove she actually does run)
With some care, she'll run real slow.
This'll tide me over till I find the right era MM1 at the right price..
No comments:
Post a Comment